Comment utiliser un mode réseau dans l'autoradio ?
En mode réseau, les autoradios produisent trois types de sorties :sortie haute fréquence, fréquence moyenne ou sortie passe-bande et sortie basse fréquence.
Mais qu'est-ce que le mode réseau et comment le configurer correctement ? Découvrons.
Le mode réseau est utilisé pour configurer les tweeters, les médiums et un woofer à partir des canaux de sortie séparés de l'autoradio. Parallèlement à cela, vous devez également changer le mode de fonctionnement en mode réseau sur l'autoradio.
Dans cet article, je vais approfondir la façon d'utiliser le mode réseau sur votre autoradio et quelles sont les exigences de disposition des haut-parleurs dans ce mode.
Qu'est-ce que le mode réseau dans l'autoradio ?
Chaque autoradio dispose de fonctionnalités audio avancées intégrées. Un autoradio peut être configuré en mode standard ou en mode réseau à trois voies.
En mode réseau, vous configurez les sorties audio sur haut, moyen et bas car il s'agit d'une sortie à trois voies :
- la sortie haute fréquence est destinée aux tweeters
- sortie moyenne fréquence pour haut-parleurs de milieu de gamme
- et sortie basse fréquence pour subwoofers
Ainsi, en mode réseau, vous pouvez connecter ces trois éléments à votre système audio de voiture.
Vous devez vous rappeler que vous perdrez toutes les données stockées dans la chaîne stéréo lorsque vous réinitialiserez votre autoradio. Votre couleur a donc disparu, les préréglages ont disparu, votre téléphone ou vos appareils connectés ont été supprimés.
Pour vérifier si votre autoradio est en mode standard ou en mode réseau, chargez le disque puis allez dans « paramètres son ."
Faites défiler vers le bas et accédez à "niveau du haut-parleur .” Vous verrez deux tweeters, deux médiums et un subwoofer, selon les caractéristiques de votre autoradio. Cela signifie que votre autoradio est en mode réseau.
Quelle est la différence entre le mode standard et le mode réseau ?
Lorsque vous allumez votre autoradio pour la première fois ou effectuez une réinitialisation d'usine, il vous sera demandé de sélectionner d'abord la langue, puis de choisir entre le mode standard et le mode réseau.
Le mode réseau est un système de sortie à 3 voies, alors qu'en mode standard, l'autoradio a une sortie audio à 2 voies, mais ce n'est pas la seule différence.
Il existe deux différences principales entre le mode standard et le mode réseau -
- La différence entre les sorties RCA
- Utilisation des croisements
Examinons-les un par un.
La différence des sorties RCA
En regardant à l'arrière de la chaîne stéréo, certains ont trois ensembles de sorties RCA pour faire fonctionner des amplificateurs externes.
Paire supérieure de sorties RCA
En mode standard, le premier ensemble de sorties RCA sont les sorties audio avant. Ce sont des sorties audio pleine gamme de toutes les sources, y compris Bluetooth.
En mode standard, les appels téléphoniques Bluetooth sont entendus via les sorties RCA avant ou depuis les haut-parleurs avant.
En mode réseau, le jeu supérieur de sorties RCA devient des sorties audio haut de gamme utilisées pour connecter des tweeters. Par conséquent, lorsque vous choisissez le mode réseau, vous ne recevrez pas d'appels téléphoniques via les canaux avant.

Paire médiane de sorties RCA
En mode standard, le jeu central de RCA est destiné aux haut-parleurs arrière. Dans ce mode, il s'agit de sorties audio pleine gamme et aucun appel téléphonique n'est entendu des haut-parleurs connectés à ces sorties.
En mode réseau, le RCA central devient les sorties audio de milieu de gamme, et les signaux Bluetooth pour les appels téléphoniques sont également envoyés via ces connexions RCA. De plus, vous pouvez appliquer à la fois un filtre passe-haut et un filtre passe-bas à cette sortie en mode réseau.
Paire inférieure de sorties RCA
La troisième paire de sorties RCA est utilisée pour le subwoofer en mode standard et en mode réseau.
Utilisation des croisements
- En mode standard, le système utilise un filtre passif.
- En mode réseau, le système utilise les croisements internes de l'autoradio. Par conséquent, le mode réseau offre plus de flexibilité dans la configuration des points de croisement que les croisements passifs.
Est-ce que je choisis le mode réseau ou le mode standard sur ma radio ?
Le mode réseau et le mode standard sont deux manières fondamentalement différentes de câbler, configurer et installer votre autoradio.
Le choix d'utiliser votre chaîne stéréo en mode standard ou réseau dépend du type de système audio de voiture que vous souhaitez.
Par exemple, si vous souhaitez un arrangement audio avec des haut-parleurs coaxiaux standard à large plage connectés à l'avant, à la porte arrière et un subwoofer à l'arrière, vous devez choisir le mode standard.
En mode réseau, la chaîne stéréo délivre trois sorties :
- élevé
- moyen
- basse fréquence
Donc, si vous allez configurer un subwoofer, un médium et des tweeters, vous choisissez le mode réseau sur l'autoradio.
Maintenant, la prochaine question qui vient souvent à l'esprit est :
J'ai un haut-parleur coaxial dans la porte arrière, un tweeter et un médium dans la porte avant et un subwoofer dans le coffre. Should I use network mode?
The answer is NO because the arrangement is for the front, rear, and sub-channels, even though you have different audio drivers.
The easiest way to think about it is if you have a rear speaker, then you are not doing network mode.
When making adjustments to the systems in either network mode or standard mode, keep in mind that the speaker level outputs always give out the same frequency that you can compare to the RCA outputs.
How to Set up Network Mode In-Car Radio
Setting up the network mode is not complicated, and I will use the Pioneer AVH 2400NEX for the example below so that you can follow it directly.
However, most Pioneer radios have the same settings, so there should be no differences in the process.
For New Car Radio
If you have a new car stereo, follow these steps to set up network mode:
- If your car radio is brand new and it has powered up for the first time, then the first thing you have to do is select the “language.”
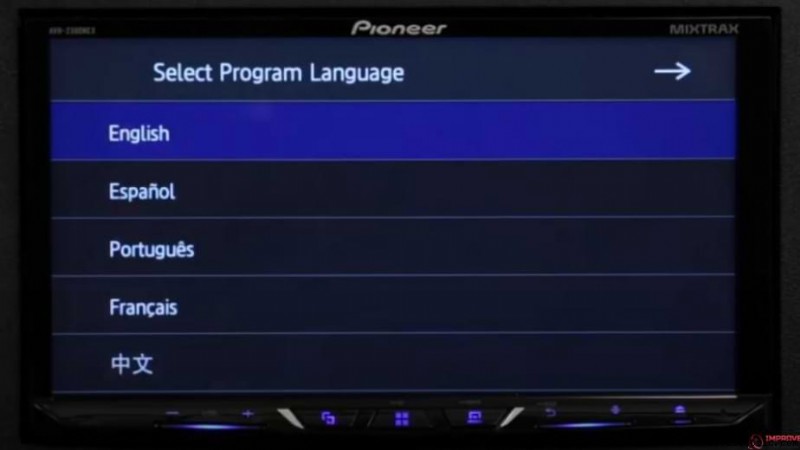
- After choosing a language, the next question you see is the fundamental setup question regarding the audio system. Again, you will see two modes – standard mode and network mode.
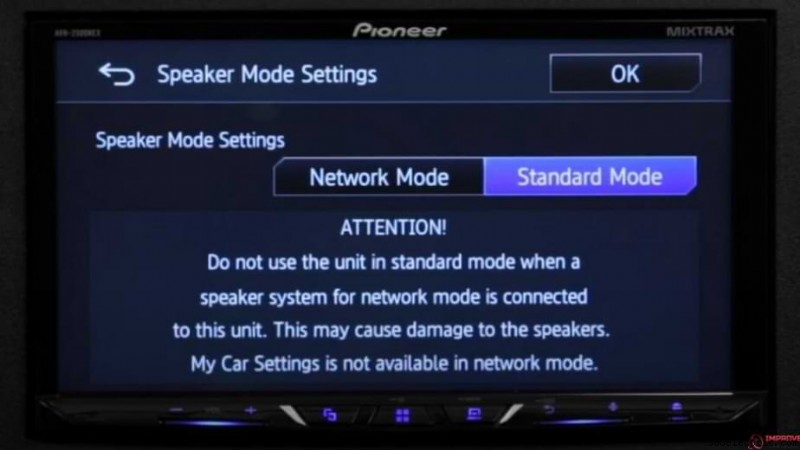
- Select the “network mode,” press OK, and now your stereo is in network mode.
For Old Car Radio
Now, what if your car radio is not brand new or already in standard mode?
Most people are already using their car radio in standard mode. To put the car radio into network mode, follow these steps.
Restore Car Radio
- Go into the “settings” of your car radio. Scroll up and hit “Restore Settings,” then hit “restore.” Wait patiently, and it will restore the settings of your car stereo like that of a new one. Each stereo has a slightly different procedure to restore settings, so you should read the device manual to find out how to restore factory settings.
- Now select the language of your car radio, and the next thing you have to choose is “network mode.”
- Congratulations, your stereo is now in 3-way network mode.
How to Connect Speakers to a Car Radio in Network Mode?
After choosing the network in your radio, the next thing is to hook up the tweeters, subwoofer, and midrange speakers to the car radio.
When setting up this system, it is critical to understand the frequency response of the tweeter and midrange driver package.
- First, you have to connect the tweeters. If you are using an amplifier, the steps remain the same. The front RCA – white and grey have to be connected to tweeters.
- The next are the midrange speakers, which you must connect through purple and green rear RCA outputs. This is important because of the crossovers, the volumes, and the time connections. So, you have to get this portion right.
- There is no deck power for the subwoofer. The RCA connections for the subwoofer are the only ones that do not change between the standard and the network mode.
The above steps explain how the 3-way network system is connected. The whole idea of doing network mode is to throw passive crossover away from the car sound system because passive crossover is a power-robbing device.
There are various advantages of using car radio in network mode rather than passive crossovers.
In network mode, you have more control over the frequency settings, and you can pick up crossover points, for example, at 6, 12, 18, 24 dB.
Most tweeters also have an attenuation circuit that allows you to attenuate like +3dB, 0, or -3dB in the standard mode, but when your radio works in the network mode, the volume control allows you to attenuate (gain it up or gain it down) the tweeter any way you want.
How to Adjust Crossover Points in Network Mode?
The confusion many people will face is when it comes to the crossovers. It isn’t obvious for beginners and may need professional help, so let’s go through the basics.
As a general rule, the frequencies should be set at the crossover as follow:
- For tweeters, tune the crossover points to the high frequency range
- for midrange, adjust crossover points to mid-frequency output
- tune the subwoofer to low frequencies
Here are the steps to set crossover points in network mode:
- Open the speaker settings in the stereo, go to the “balance ,” and you will see a screen that shows a balance between left and right speakers.
- Now go to “crossovers ,” and you will have features like high pass filter, mid low pass, mid high pass, and subwoofer. There are also numbers appearing on the screen that show crossover points.
- For any high pass filter, you can set the crossover at 1.25K, 1.6K, 2K, 2.5K, 3.15K, 4K, 5K, 6.3K, 8K, 10K, and 12.5K, but these points may be slightly different in different stereos.
- The crossover is critical as it protects your speakers from blowing, so you have to get it right. What I recommend doing is to connect each speaker individually and listen to them one by one. While adjusting crossover points, you want to make sure that you are not getting any undesirable sound or distortion from them.
- After this, play the speakers in pairs. For example, play tweeter and midrange together and see how they sound or play tweeter and subwoofer together, adjust the crossovers and see if they are producing any distortion or not.
In the following steps, I will show you exact crossover points for all drivers.
For this, you may need an RTA (real-time analyzer), which is a PPA 3 device (personal audio assistance). The screen on RTA shows you how your sound looks and what it does to the speakers. If you do not have the RTA, much more affordable options is to use the AudioControl SA-4100i Omni-directional Audio Test and Measurement Microphone to measure not only frequencies for each speakers, buy also its polarity that is critical for the best sound quality.
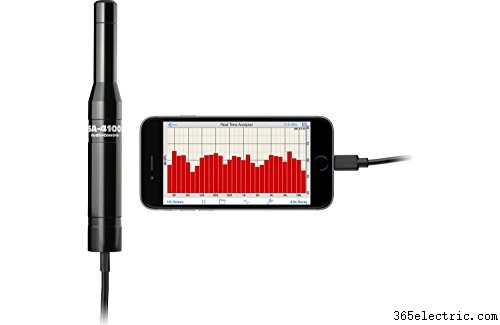
The best is to use the pink noise tracks to analyze the sounds. Pink noise puts out a flat-level sound ranging from 20Hz to 20,000Hz (human hearing range), and when adjusting the crossovers, you can see the exact sound level on each frequency on the RTA screen.
Now you have arranged your stereo and RTA screen, follow these steps to set up crossover points in network mode.
- Connect the RTA screen to the high-frequency output of a car radio.
- Go to “crossovers ,” and for a high pass filter. An excellent place to start is 8K, giving you a 6dB slope. This means that the tweeter will play down to 8KHz but not lower than that. As you adjust the crossover points, the graph on the RTA screen changes. Our main motive is to adjust the crossover points such that the tweeter gets tuned to high-level frequencies.
- Connect the RTA screen to the car stereo’s mid-range or bandpass frequency output. You will see that the mid-high pass filter is turned off, and it shows a pretty much flat response on the RTA screen.
- Turn on the mid-high pass filter by clicking on the “HPF,” and it will display “HPF On.” Adjust the crossovers so that it covers the mid-range frequencies. The ideal crossover point is 10K, or you can see the frequency ratings on speakers and adjust accordingly.
- In the same way, adjust the crossover points of the low pass filter.
Up to this step, you have tuned midrange, tweeter and now let’s adjust the subwoofer.
- To tune the subwoofer, connect the RTA screen to low-frequency outputs of the car radio. Click on this sign (<) , and it will take you to the subwoofer.
- Adjust the crossover points for the subwoofer to tune the low-level frequencies. For subwoofers, you should set the crossover points at 80Hz.
Conclusion
When switching between network and standard modes, please be aware that just changing modes on the stereo is not enough. You have to completely change your audio system, including the speakers and the amplifier wiring.
Changing modes just on the stereo without other adjustments will damage your speakers if you don’t take time to rewire your stereo, so it is crucial to understand the differences between the standard and the network modes.