Comment installer des enceintes de plafond sans grenier
Si vous n'avez pas de grenier pour manœuvrer et installer vos haut-parleurs de plafond, on peut penser que ce serait difficile alors qu'en fait ce n'est pas le cas. Cependant, cela dépendra également du type de plafond que vous avez et du matériau à partir duquel il est fabriqué. De plus, il y a d'autres questions que vous devez poser sur les enceintes de plafond avant votre installation, et cet article couvre tout.
Pour installer des haut-parleurs de plafond dans un plafond conventionnel sans grenier, il vous suffit de percer un trou dans le plafond et d'y fixer les haut-parleurs. Ensuite, en tenant compte de votre type de haut-parleur (actif ou passif), installez les câbles appropriés en conséquence. Si vous n'avez pas de plafond conventionnel, vous devriez alors consulter un professionnel.
Cet article détaillera tout ce que vous devez savoir pour installer des haut-parleurs de plafond, qui comprendra tous les différents types de plafond que vous obtenez et tous les matériaux à partir desquels ils peuvent être fabriqués.
Ensuite, vous pourrez comparer cela au plafond que vous avez et prendre une décision éclairée si vous installerez vos enceintes de plafond vous-même ou avec un professionnel.
Ensuite, nous examinerons les caractéristiques des haut-parleurs de plafond et détaillerons tous les aspects que vous devez prendre en compte, y compris les types de haut-parleurs que vous obtenez, la taille que vous obtenez, la taille de la pièce que vous devriez avoir, où les installer, l'indice IP des haut-parleurs et plus.
Enfin, nous vous expliquerons étape par étape comment installer des haut-parleurs de plafond dans un plafond en cloison sèche sans grenier.
Lire aussi :Pourquoi les haut-parleurs de plafond sont bons (en valent la peine) pour le son surround
Facteurs à prendre en compte lors de l'installation d'une enceinte de plafond sans grenier
Système de montage
Le système de montage conçu et installé sur les enceintes de plafond est généralement facile et rapide à installer, nécessitant peu d'efforts. Même une personne sans expérience aura du mal à ne pas comprendre et à pouvoir fixer l'enceinte au plafond avec un tournevis.
Pinces
Les pinces sont un autre aspect de la conception lié à la façon dont le haut-parleur est monté au plafond. Une fois les supports et le système de montage installés et fixés, les haut-parleurs sont parfois équipés d'une pince que vous ferez pivoter vers l'extérieur, ce qui augmentera la sécurité et la fiabilité.
Classement IP
Si vous envisagez d'installer vos haut-parleurs de plafond dans une salle de bain ou à l'extérieur, vous devez tenir compte de l'indice de protection IP du haut-parleur.
L'indice IP tient compte de la résistance de l'enceinte à certains éléments tels que la vapeur, l'humidité, les températures chaudes et froides et l'eau. Plus l'indice est élevé, plus le haut-parleur est conçu pour gérer tous les éléments, et un indice IP de 65 est le plus élevé qu'un haut-parleur puisse obtenir.
De combien d'enceintes ai-je besoin ?
Cela dépend uniquement de la taille de la pièce. Si les haut-parleurs sont à moins de 6,5 pieds l'un de l'autre, il serait alors optimal d'installer un seul haut-parleur stéréo.
Si vous avez un grand salon ouvert ou une extension, vous pouvez installer deux haut-parleurs mono ou plusieurs paires de haut-parleurs mono à différents points vitaux de la pièce.
Découvrez ce haut-parleur de plafond stéréo unique d'Amazon ici
Découvrez ces enceintes de plafond double mono sur Amazon ici
Quelle taille d'enceintes dois-je acheter ?
La taille standard des haut-parleurs de plafond est de 6,5 pouces. Cependant, vous obtenez des tailles plus grandes et plus petites. Les haut-parleurs de 8 pouces vous donneront une meilleure réponse des basses, surtout si vous avez une paire de deux haut-parleurs de plafond mono.
Des haut-parleurs plus petits offriront l'avantage de la polyvalence en termes de possibilité de les placer dans plusieurs positions. En plus de cela, vous avez également la possibilité d'en placer plus dans votre plafond.
De plus, des haut-parleurs plus grands offriront un son de meilleure qualité et pourront gérer plus de puissance, qu'il s'agisse de haut-parleurs de plafond actifs ou passifs.
Découvrez ces haut-parleurs de plafond de 6,5 pouces d'Amazon ici
Découvrez ces haut-parleurs de plafond de 8 pouces d'Amazon ici
Découvrez ces haut-parleurs de plafond de 3 pouces d'Amazon ici
Où positionner les haut-parleurs
Cela dépend entièrement de l'individu, mais la meilleure façon de déterminer où vous devez placer vos haut-parleurs se situe généralement autour des points critiques. Cela pourrait être situé autour des zones assises ou des zones que votre divertissement
Espace au plafond
Étant donné que vous n'avez pas de grenier et que vous installerez très probablement vos enceintes de plafond dans votre plafond en cloison sèche, vous devez vous assurer que vous disposez de suffisamment d'espace.
Assurez-vous d'avoir une profondeur d'environ quatre pouces dans votre plafond, afin de pouvoir y installer les haut-parleurs. Vous obtenez des haut-parleurs qui ont une profondeur moins profonde; cependant, vous devrez payer un prix plus élevé en raison de la conception.
La conception est basée sur le fait que le fabricant doit construire le même haut-parleur de qualité dans un espace plus compact.
Découvrez ces haut-parleurs de plafond à faible profondeur d'Amazon ici
Comment installer des haut-parleurs de plafond sans grenier
Voici un guide étape par étape détaillant la procédure à suivre pour installer vous-même des enceintes de plafond si vous aviez un plafond standard en cloison sèche (Sheetrock).
Outils nécessaires pour les haut-parleurs de plafond
- Tournevis cruciforme
- Crayon
- Scie à tôle (scie cloche)
- Escabeau
- Modèle de découpe
Tutoriel étape par étape
Le processus est assez simple; cependant, la partie principale de cette opération de bricolage serait de considérer les haut-parleurs dont vous disposez.
Sont-ils des haut-parleurs actifs ou passifs ?
With this in mind, you would have to run cables and power extensions either through the plenum space (top part of your ceiling) or on the ceiling itself and either attach them to the roof and hide them with a cable cover.
Check out this cable cover on Amazon here
- The first thing you would do is decide where you would like to place your speaker or speakers and then stick the roof’s cutout template.
- Next, you would outline the template with the pencil and then detach the template from the roof to see the shape that you need to cut out of the ceiling (your ceiling speakers will come with a template).
- You would then use the Sheetrock saw to puncture the roof and continue to cut out the dimensions that you stenciled with your pencil.
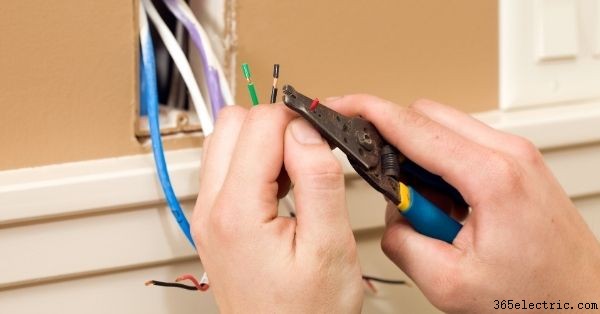
- Next, you would attach the cables if any, to the ceiling speakers taking note of the terminals indicated by the colors red and black if you are using passive ceiling speakers. Furthermore, if you are using active speakers, you would have to connect your power source to them.
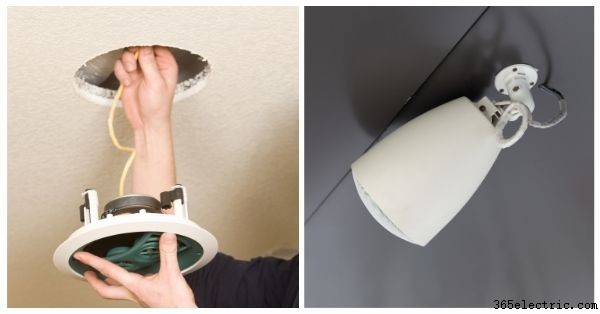
- Following that, you would insert the ceiling speakers into the rook and use the Philips screwdriver to turn and fasten the mounting system that comes attached to your ceiling speakers. (do not use power tools and screwdrivers because they could cause unnecessary problems if you secure the speakers too tight.
- Next, if your ceiling speakers come with clamps, adjust and turn them accordingly so that your ceiling speakers are now secure in your roof.
- Lastly, fit the grill to your ceiling speakers, and you should be good to go.
What types of ceilings are there?
There are many different types of ceilings, and even if you have an attic, some of these ceilings may prove challenging to install a ceiling speaker into them.
For the most part, it would be easiest to install ceiling speakers into the first two options. If your ceiling is somewhat decorative and fancy, then it would be best if you hire a professional to install your ceiling speakers for you.
Easiest ceilings for installation of ceiling speakers
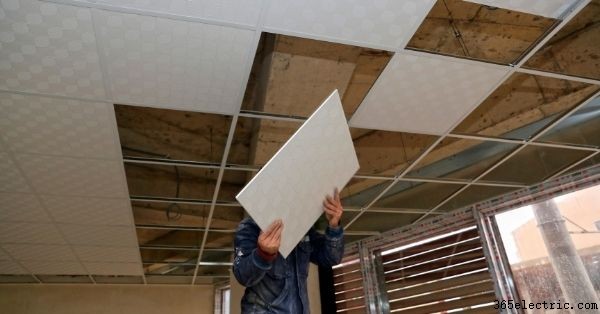
Suspended ceiling
Typically seen in offices and some homes, a suspended ceiling is generally lower than the main part of the ceiling hiding its inner workings and sectioned off by beams or metal pieces. This type of ceiling is constructed using typical materials such as Sheetrock, and the space that It covers is termed the plenum space.
Regular ceiling (conventional ceiling)
The typical home ceiling will range from 8 to 10 feet. These types of ceilings are readily accessible and are constructed from standard materials (wood or Sheetrock).
One thing to consider is that if you are having a ceiling installed, you should leave at least 6,5 inches of depth between the very top part of the roof and the ceiling in order to be able to install ceiling speakers.
This type of ceiling and a suspended ceiling would be the easiest to install ceiling speakers and would not need you to hire a professional.
Exposed ceilings
Exposed ceilings are ceilings that have their inner workings are shown (you can see gas pipes and air vents). For the most part, this ceiling will be professionally done, and there will be sections that are covered to give the ceiling a specific characteristic or design.
Depending on the material used for particular areas of this ceiling, you may need to hire a professional to install ceiling speakers here.
Cove ceilings
Cove ceilings have many different designs, and the concept that a cove ceiling utilizes is that the ceiling elevates towards the center gradually.
Depending on how the rises are installed and the material used (wood or Sheetrock), you will be able to cut away sections of the top to install ceiling speakers without having to hire a professional.
Shed ceilings
These ceilings are typically made with a slant where one point of the ceiling is lower than the other. The slant can either be gradual or sharp, depending on the design. Furthermore, the materials used in the construction of these ceilings are standard material such as wood and Sheetrock (drywall)
Most difficult ceilings for installation of ceiling speakers
Vaulted ceilings
There are a few sub-categories of vaulted ceilings as there are many of these ceiling types, but to detail, all of them is beyond this article’s scope.
Vaulted ceilings are designed with a V shape in mind and can be constructed with a shallow, gradual slope or a deep, sharp slope. The materials used to create this type of ceiling varies, and you should only attempt to install ceiling speakers into them yourself if you know DIY.
Beamed ceilings
These are ceilings that expose the beams of the roof. There might be panels that will be fitted alongside the beams, and there may not be.
It would be best if you did not try to install ceiling speakers in the shafts of your house for any reason (beams are there for structural support, and any tampering with them could be detrimental to your home).
However, if your ceiling does have panels or other types of fixtures made from standard material, you would have the option of installing ceiling speakers into that section of the roof.
Barrel vault ceilings
As you would have guessed, these ceilings shape a barrel (round in profile). Typically made from stone or brick, it would be better if you choose to mount the ceiling speakers on your wall rather than installing ceiling speakers into them even by hiring a professional.
Tall ceilings
Tall ceilings can be much higher than 10 feet, and it would be unwise to try to install ceiling speakers into them without a professional’s aid. Also, tall ceilings are not usually made with standard materials, so it would probably be best to mount them to the wall.
Coffered ceilings
Coffered ceilings are made from various materials and can incorporate different styles bringing some elegance and beauty to your home. However, these ceilings would prove problematic when trying to install ceiling speakers, and a professional should be consulted to see if it can be done.
Tray ceilings
These ceilings are similar in design to both vault and cove ceilings offering aspects of both. The materials used can vary, and you would have to consult a professional if you would like to install ceiling speakers into them.
What are the materials used for ceilings?
The different types of materials used to create and ceilings are tiles, tin, wood, wood panels, wood sheets, drywall (Sheetrock is a brand of drywall), brick, concrete, stenciled plaster, and stone.
All ceilings will be designed differently, but typical inexpensive ceilings will probably use drywall as their material as it Is the standard that is used.
Whatever you decided to do with your ceiling speakers, first make sure that you know what ceiling and ceiling material you are dealing with and consult a professional before you jump ahead, start trying to cut out holes and destroy parts of your home.
What types of ceiling speakers are there?
Ceiling speakers in most aspects are identical to standard home entertainment HiFi speakers with one or two exceptions. Furthermore, they are almost similar to a car stereo speaker.
They are not housed in a container, and the most common type of ceiling speakers are passive (more on that under the next headings); however, you are able to purchase enclosures to put them in, and they function the same way as any other speaker, including these two ways;
Active ceiling speakers
Active ceiling speakers are speakers the fit into your ceiling that has a built-in amplifier. This means they do not need to connect to an external powered stereo amplifier or an AV receiver to be driven.
It will also mean that your ceiling speakers do not need to have speaker wire connected to them, running to an external source for amplification.
Passive ceiling speakers
Passive ceiling speakers do not have an amplifier built into them. They have to have speaker wire connected to them, and then that wire has to run to a form of external amplification such as a powered stereo amplifier or an AV receiver.
Mono vs. single stereo speaker
Before we dive into this sub-heading, it is essential to note that you get both active and passive speakers for both mono and single stereo ceiling speakers. That means that both the types of speakers we are about to cover come with a built-in amplifier, or they do not.
Mono ceiling speakers are dedicated left, and right speakers and are suitable for rooms larger than 4m by 4m. These speakers are great because, just like regular speakers, they provide better and more accurate stereo separation.
If your room is smaller than 4m by 4m, then you may want to consider getting a single stereo speaker. A single stereo speaker has two tweeters built into it; hence you do not lose out on the stereo separation.
However, keep in mind that you do get more stereo separation when you have dedicated left and right mono ceiling speakers rather than a single stereo speaker.
Furthermore, if you only intend to install one speaker in your ceiling, then it would be in your best interest to install one stereo speaker. Otherwise, you will only receive a mono signal (either the left or right signal) when installing one mono ceiling speaker.
What features do ceiling speakers have
Wireless functionality
Some ceiling speakers have wireless capability, including Bluetooth. This is fantastic because you do not have to worry about running wires through your ceiling. You would need to run wires to connect your passive speakers to a powered stereo amplifier or an AV receiver.
One thing to note is that you would still need to run a power connection of sorts to get them to switch on. Otherwise, these would be a great option and easy to install.
You would also be able to connect to them with any device that has Bluetooth capability, like your smartphone, tablet, computer, projector, and more.
Grills
Depending on the style of your room and taste, some ceiling speaker grills come in different shapes. The two most common are round and square; however, you do get oval-shaped ones.
Space
Back box (enclosure)
Most ceiling speakers do not come with an enclosure as regular speakers do. You may want to consider purchasing a pair for your ceiling speakers for reasons that include if you have a room above the ceiling (a bedroom or a room that receives a lot of traffic), and a ceiling speaker back box helps direct and keep the sound pointed towards the direction of the speaker actually improving the quality of the sound.
Check out this pair of ceiling speaker backboxes from Amazon here
Conclusion
The process of installing ceiling speakers is pretty simple, and if you have a standard ceiling made from drywall (Sheetrock), this quick DIY tutorial is all you need.
However, we learned that you get various types of ceilings made from different materials, and some of them could be problematic if you intend to install ceiling speakers.
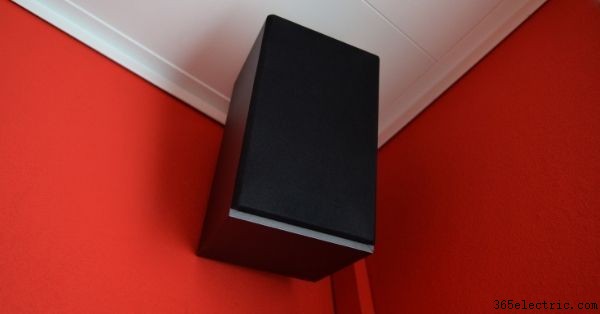
In cases where you have a non-standard ceiling or a ceiling made from other materials rather than drywall, it would be best to consider consulting a professional or attaching them to your wall rather than your ceiling.
Besides learning how to install ceiling speakers if you have no attic, we learned that there are various types of ceiling speakers. They can have Bluetooth features, be different sizes, be mono or stereo, and have multiple shapes.
We also covered all the essential questions you would need to ask if you intend to install ceiling speakers yourself. At this point, you should be able to install your ceiling speakers with relative confidence without the need to hire a professional.