Comment brancher un autoradio à l'alimentation secteur – Vous POUVEZ le faire !
Vous souhaitez utiliser votre autoradio à la maison ? Bonne nouvelle - ce n'est en fait pas si difficile…si vous savez ce dont vous aurez besoin.
Dans cet article, je vais vous montrer comment brancher un autoradio sur secteur avec :
- Ce que vous devez savoir en premier
- Schémas de câblage clairs et faciles à suivre
- Quels types d'adaptateurs ou de fournitures d'alimentation CA pouvez-vous utiliser ?
- Comment câbler l'alimentation d'un ordinateur à un autoradio
…et plus! Il n'y a aucune raison d'attendre, alors commençons.
Tout d'abord :peut vous branchez un autoradio à une prise domestique ?
La réponse rapide est oui, avec la bonne alimentation électrique, vous pouvez brancher un autoradio à une prise domestique avec une alimentation de 120 V ou même de 220 V. Cependant, vous ne pouvez pas connecter directement un autoradio à une prise.
Cependant, vous n'aurez besoin de connaître que quelques éléments pour vous assurer de ne pas avoir de maux de tête ou de ne pas détruire votre autoradio.
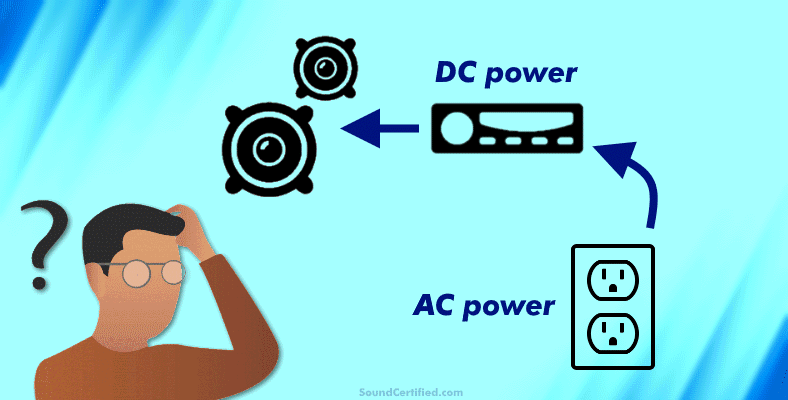
Est-ce qu'un autoradio est CA ou CC ?
Les autoradios utilisent une tension de courant continu (CC) pour alimenter leurs appareils électroniques, tandis que les appareils électroniques domestiques utilisent un courant alternatif (CA) avec une tension beaucoup plus élevée. En fait, les autoradios peuvent fonctionner jusqu'à environ 11 volts CC, 12 V à 14,4 V étant typiques lorsque le moteur d'un véhicule tourne.
La raison pour laquelle les autoradios utilisent l'alimentation CC est que les automobiles utilisent une batterie CC pour démarrer et alimenter le moteur. Pendant que le moteur tourne, un alternateur génère du courant alternatif qui est changé en courant continu afin de charger la batterie. Les batteries stockent le courant continu, pas le courant alternatif.
Quelle tension les prises domestiques utilisent-elles ?
Les prises secteur domestiques fournissent environ 120 V (volts ou « V ») CA si vous êtes aux États-Unis et dans d'autres pays. D'autres que j'ai visités sont encore plus élevés à 220 V AC. C'est extrêmement dangereux d'essayer de connecter un appareil DC à l'alimentation AC - en fait, il peut même exploser ou prendre feu.
Ce dont vous avez besoin, c'est d'une alimentation électrique pour réduire en toute sécurité la haute tension d'une prise secteur domestique à une tension continue inférieure à celle qu'un autoradio peut utiliser.
Combien d'ampères consomme un autoradio ?
La bonne nouvelle est que, contrairement aux amplificateurs de voiture, un autoradio ne consomme que quelques ampères. Les autoradios typiques (selon la conception, les caractéristiques, etc.) consomment environ 2 à 5 ampères à pleine puissance.
J'ai vu certaines unités qui ont un fusible de 10 ampères, mais cela ne signifie pas qu'elles utilisent autant de courant. Les fusibles sont disponibles dans certaines tailles, c'est donc le suivant le plus proche que le fabricant devait utiliser.
Bien que les fabricants d'autoradios puissent les annoncer avec des puissances nominales élevées telles que "50 W crête par canal", en réalité, l'autoradio moyen ne peut émettre qu'environ 15 à 18 watts RMS par canal.
C'est parce qu'ils doivent fonctionner avec une alimentation +12 V, ce qui limite la puissance qu'ils peuvent fournir.
Qu'est-ce que le câble d'accessoire 12 V sur un autoradio ?
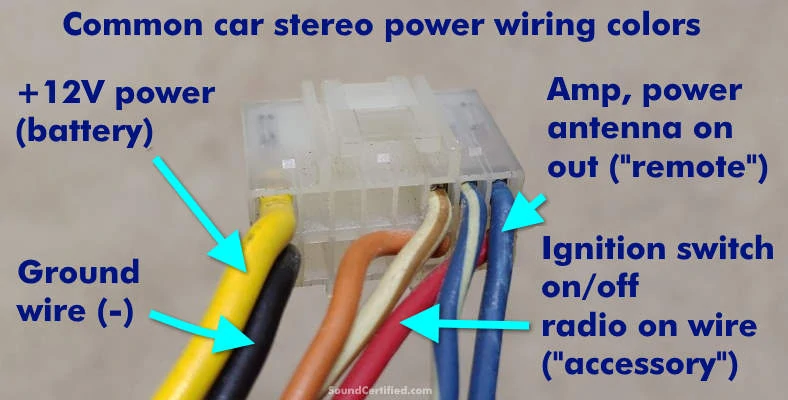
Les autoradios ont 3 fils d'alimentation qui doivent être connectés pour fonctionner :
- Masse/négatif, "GND"
- Alimentation +12V/sauvegarde mémoire radio "BATT"
- Accessoire activé, "ACC"
Pour 99 % des autoradios, le fil accessoire 12 V est un fil de signal de couleur rouge qui déclenche l'allumage de l'électronique. Ils sont normalement connectés au fil accessoire du commutateur d'allumage d'un véhicule pour s'allumer et s'éteindre avec le commutateur.
Il est nécessaire de le connecter pour allumer un autoradio. Lorsque l'alimentation est coupée du fil accessoire de la radio, elle s'éteint et passe en mode basse consommation.
Que puis-je utiliser pour alimenter un autoradio à la maison ?
La bonne nouvelle est que des alimentations 12 V sont disponibles si vous regardez au bon endroit - et celle qui convient pour brancher un autoradio à l'alimentation secteur ne devrait pas coûter cher. Vous avez juste besoin de savoir quoi chercher.
La bonne nouvelle est qu'il n'est généralement pas difficile de trouver le bon type d'alimentation pour alimenter un autoradio à la maison. Vous en aurez besoin d'un avec 2 éléments principaux :
- La bonne tension :12 V à 13,8 V
- The right current (amps) rating:about 2 to 2.5A for most car stereos and towards 5A for some units that draw more
12V supplies are usually a lot more affordable anyway.
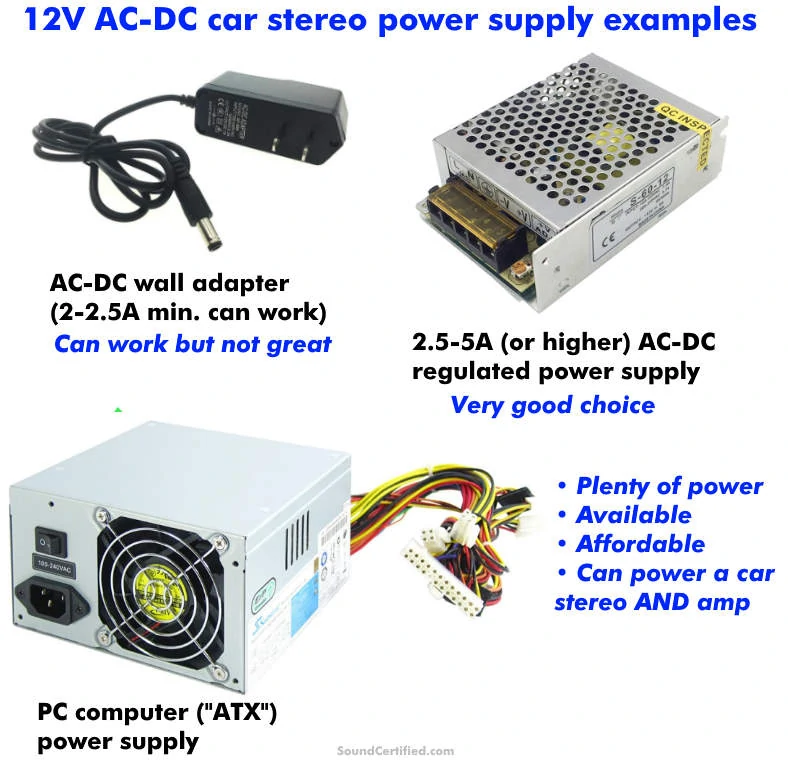
You can pick up an AC-DC supply from a variety of places:Amazon, your local electronics store, and you can even use an old PC computer supply (also called an “ATX” supply) you’ve got lying around. I’ll cover that in more detail later.
Can you use a wall adapter for a car stereo?
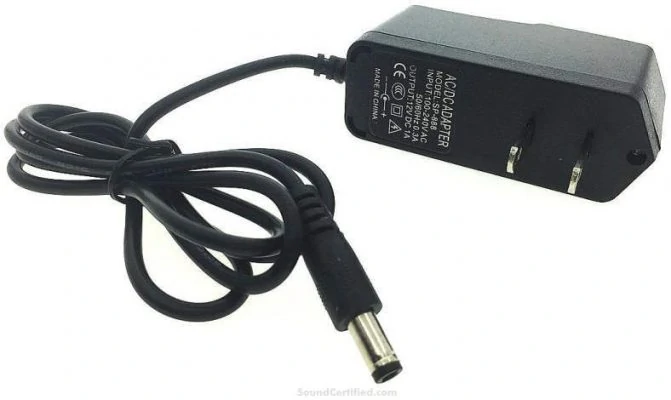
While you can use a wall adapter to power a car radio with decent results, most are pretty poor and can’t supply many amps and only a little bit of power. You’ll also need to cut the wiring which in some cases can be a little tricky since it’s sometimes very small wire.
Technically, you can use a wall outlet AC-DC 12V adapter, but I don’t recommend it.
They’re pretty limited in power output and the amperage they can provide (many are less than 1A rated). They’re designed to do things like charge devices or supply low-power devices.
They also don’t have good reserve power and when you start cranking up your car radio the voltage may begin to sag (drop out) and it won’t work well along with the sound breaking up &distorting. You’ll need to find one with enough current (say 2 to 2.5 amps or more if possible) and cut the wiring since most come with a connector attached.
Caution! When using a AC/DC wall adapter, b e careful because for some it can be hard to tell which wire is positive and which is negative.Always be 100% sure before connecting a radio to avoid a reverse polarity condition as that can damage electronics!
What to know about computer power supplies
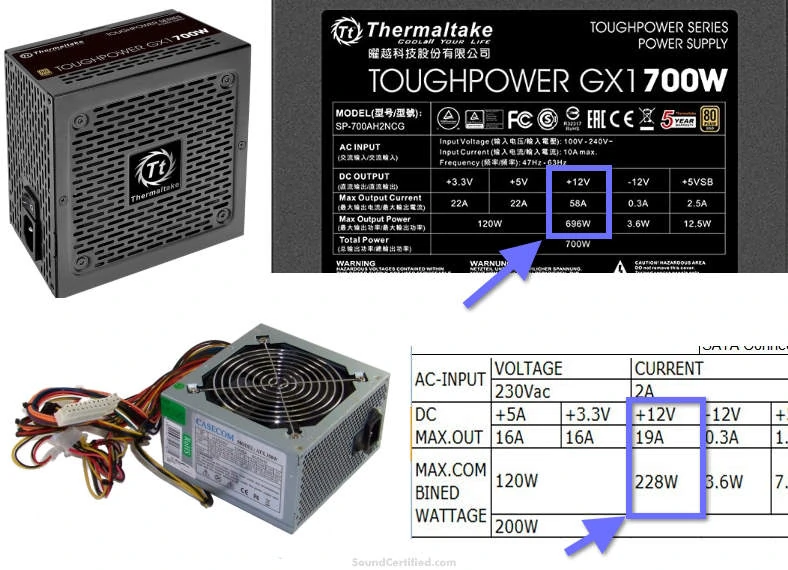
PC power supplies are also called “ATX” supplies and can provide lots of current from their 12V wiring. You can see their amps rating on the label like in these examples above.
Computer power supplies are fairly common and are usually priced pretty well (especially used). You won’t need a high-power one.
In fact, even a standard low-end 150W PC power supply will work great for a car stereo! Nearly all of them have more current output than you need.
The drawback, however, is that PC power supplies require a certain (but easy to do) wiring connection in order to turn on. That’s because they’re normally connected to a PC motherboard that provides a control signal for them to work.
Fortunately, there’s an easy workaround you can use that makes them great for a home car stereo system power source. See my detailed diagram for that further below.
How do you hook up a power supply to a car radio?
Connecting radio power and ground
To connect a car radio to a power supply you’ll need to do the following:
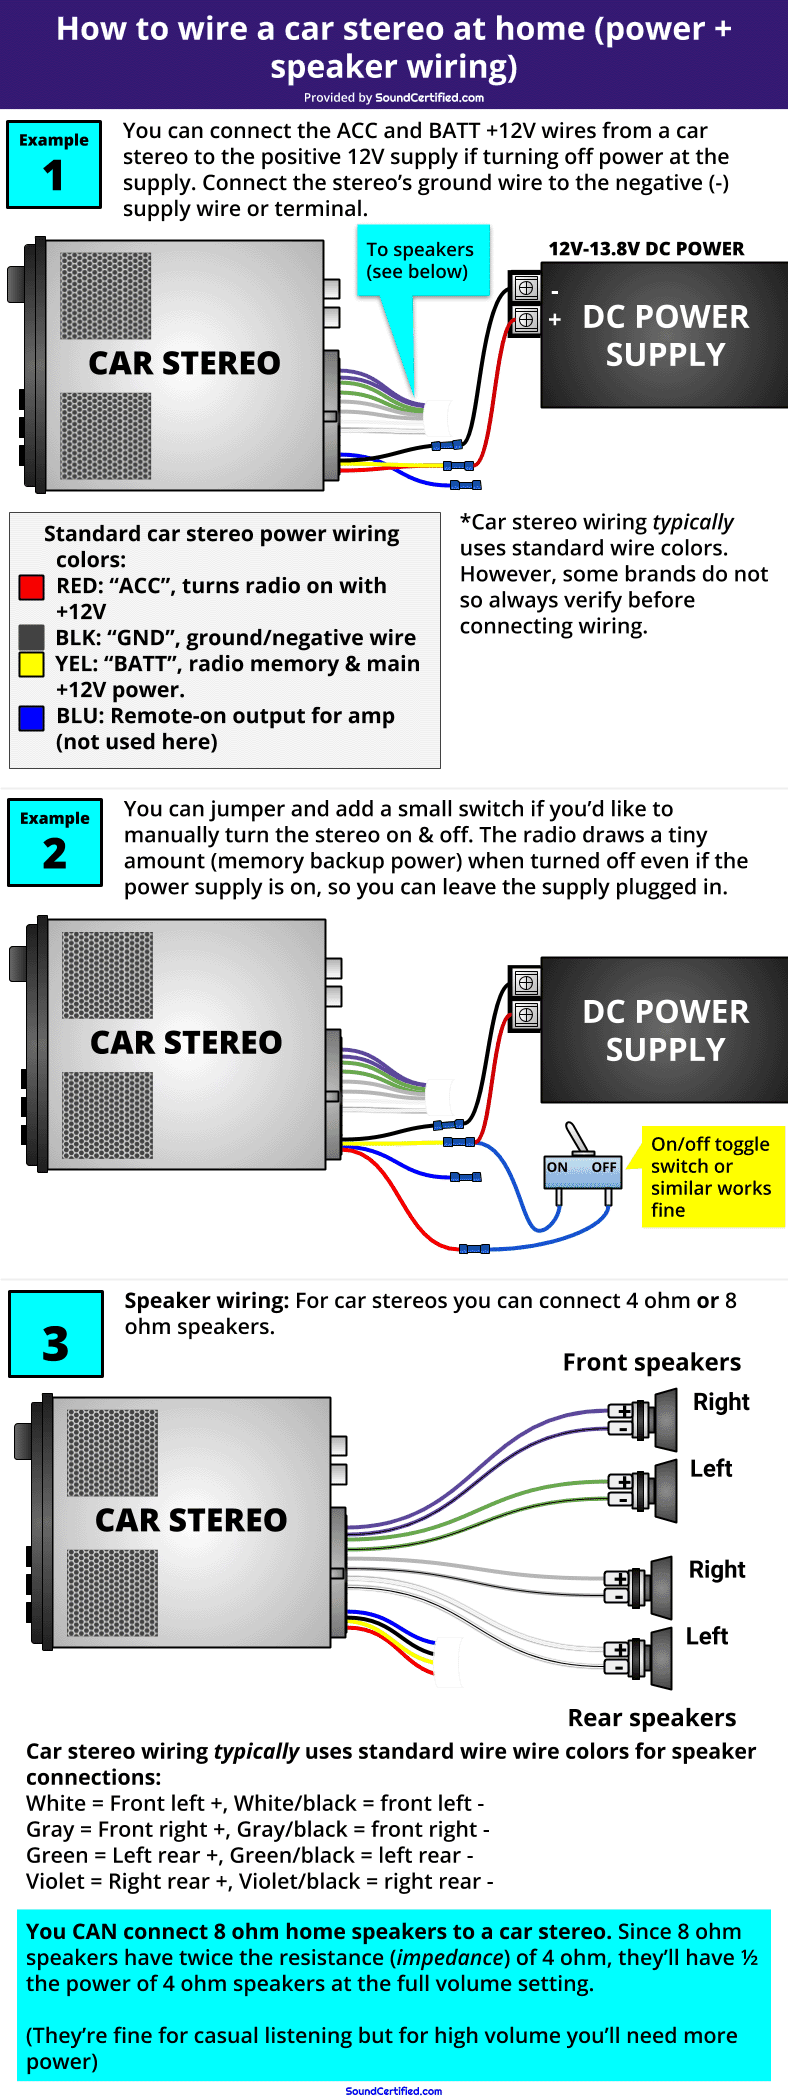
- Ground: Connect the radio’s ground wire (black wire) to the (-) power supply output
- Main power: Connect the radio’s +12V battery wire (usually the yellow wire) to the (+) power supply output
- Turning the radio on: You can do this by hardwiring the radio’s accessory wire (usually red) to the +12V battery wire or you can use a switch in between.
If you hardwire the accessory wire to the yellow wire (battery power), you can turn the car stereo off with the power supply on/off control. However, while that’s very easy, it comes with a price.
Removing power from the 12V battery wire means the unit will lose its radio tuner settings, audio settings, and any other adjustments you’ve made. Optionally, using a switch to connect the accessory wire as an on/off control is a good idea. Leave the power supply on in this case.
Another way is to simply turn the radio on/off using the power button and leave the power supply on. In either case, when turned off the radio will go into a low-power mode draw less than 0.5 amps when shut off.
Connecting the speaker wiring
Car stereos usually use standard wire colors for speaker connections:
- White =Front left +, White/black =front left –
- Gray =Front right +, Gray/black =front right –
- Green =Left rear +, Green/black =left rear –
- Violet =Right rear +, Violet/black =right rear –
Just like power wiring colors, not all brands follow these standard colors so always check first!
Remember that car stereos can’t handle a speaker impedance (Ohms speaker load) below 4 ohms. You can, however, use 8 ohm home stereos speakers although you’ll only have 1/2 the rated output power available. I’ll explain that further below.
Never connect 2 ohm speakers for example or wire speaker outputs together as the radio can become hot and permanently damaged. Car stereos aren’t designed to be bridged like a car amp.
How to wire a computer power supply to a car stereo

Using an ATX (desktop computer) power supply for a car stereo isn’t hard – in fact, you only need a few steps:
- Power connections: Cut a +12V wire (yellow) and a ground (black) wire from the main connector. Strip the insulation to leave about 3/8″ to 1/2″ bare wire. Use a crimp connector, solder, or another connector type to join the power supply’s +12V output (yellow) to the radio’s +12V battery wire (yellow). Do the same for the ground wires (black).
- Supply on control:PC supplies don’t turn on even if the on/off switch on the case is used. A PC motherboard uses a control signal to the “supply on” wire pin. To do the same, you’ll need to find, cut, and jumper this control signal wire to a ground wire either directly or with an on/off switch if you like [See diagram above]
- Radio accessory wire: Connect the radio’s accessory/on wire (red) to the +12V power wire from the supply either directly or you can use an on/off switch if you like.
Once you’ve connected the +12V and ground wiring to the radio, connect the “supply on” wire shown above to another ground wire as shown. The supply should start and your car radio should turn on.
As I mentioned earlier, switching off the power supply will cause the radio to lose its “memory” (settings, last station you played, etc) so you may find it easier to use an on/off switch on the accessory wire or turn the radio on &off using the power button.
Don’t forget that a radio uses only a tiny bit of power when turned off so you can leave your power supply running if you like.
How to connect car stereo wires together properly
You’ve got several options for how to connect car stereos wires together properly. I’ll cover a few here. Ce sont :
- Using the twist-and-tape method (not something I recommend, but it works “in a pinch”)
- Using connectors such as crimp (“butt”) connectors or wire nuts
- Soldering the wires together
I’ll cover each in detail.
1. Connecting wire using the twist-and-tape method
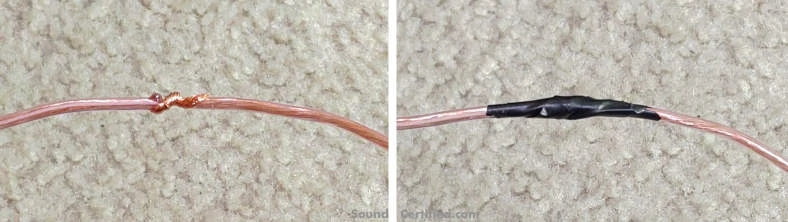
Although it’s easy to do and cheap (especially if you don’t have many tools around), it’s the least reliable way to connect speaker or car stereo wires together. In my experience, the tape can come off later or the twisted wire may work its way loose at some point.
It’s as easy to do as:
- Strip about 1/2 inch insulation from the end of each wire
- Twist the bare wire together as tightly as possible, wrapping around each other to help hold them together
- Tear off some electrical tape and tightly wind it around the exposed wire and also the wire insulation
2. Connecting wire using crimp connectors
This is one of the most reliable ways to connect wire and one I’ve used for years for car stereo installations. You’ll need one or more tools to strip your wire and crimp the connectors.
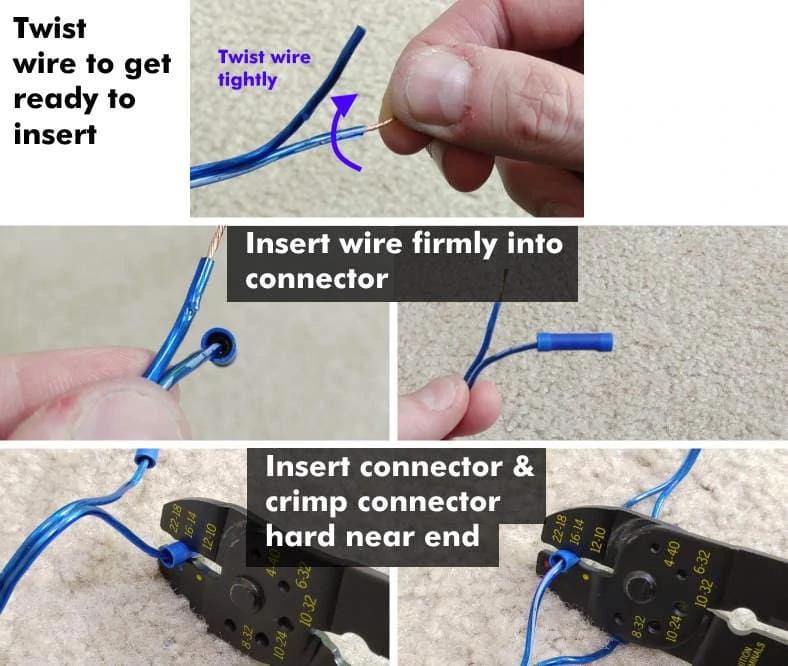
Here’s how:
- Strip the wire leaving 3/8″ to 1/2″ bare wire exposed.
- Tightly twist the wire so it can be pushed into the connector properly.
- Insert the wire into one end firmly, pushing it into the metal contact inside. Be sure to insert it fully.
- Place the connector into the crimp tool in the appropriate position in the tool, near the end of the connector.
- Crimp very hard with the tool to make press the connector down hard, holding the wire inside permanently.
- Repeat the same for the other side &you other wires as needed.
Tip: For best results, once you’re done pull gently on the wire while holding the connector. The wire shouldn’t come out. If it does, you’ve crimped it poorly and will need to do it over again.
 Examples of a wire crimping &stripping tool and crimp (“butt”) connectors. Blue is one of the most common and works well with 18AWG wire.
When shopping for crimp connectors you’ll notice they’re available in different colors for different gauges of wire. In most cases, the blue ones are fine for car speaker &radio wiring use. You can also pick up an affordable set that includes the crimp tool and connectors as well.
3. Connecting wire by soldering
This is hands-down the most reliable way to extend &splice wires as when done properly soldered wire is extremely strong and is permanent.
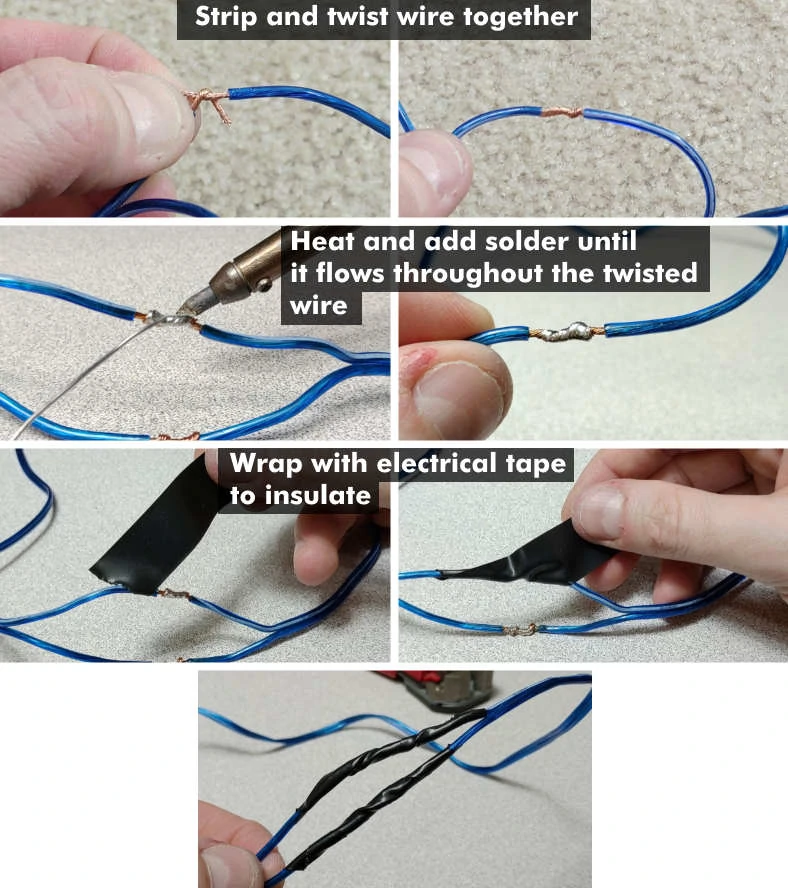
How to solder car stereo wires
- Cut &strip the wire (at least 1/2″ length of bare wire is needed).
- Hold up both ends to form an “X” shape with the wire facing opposite directions.
- Hold both ends and tightly twist each end around the other until they’re completely wrapped over each other.
- After the soldering iron is hot, apply heat to the wire with the tip. Once heated (after a few seconds usually), apply solder enough so that it has flowed fully through the wire.
- Rotate the wire to the other side and apply the solder until all of the wire is fully saturated with solder.
- Allow the wire to cool for a few moments.
- Tear 2 short pieces of electrical tape. Starting at the insulation and at an angle, tightly wrap the tape until it is fully covered.
It’s important to fully cover the wire once you’re done. That’s to prevent adjacent wires from touching each other and causing a short circuit that can permanently damage the radio’s output stages.
How long does soldering speaker wire properly take?
All in all, you’ll need about 30 minutes to solder a full set of car radio power &speaker wires or a bit less if you’re only connecting the power side.
There’s more to see! More great articles you’ll love
Whoah, don’t leave just yet! If you do you’ll miss out on some great info like these:
- Got a car amp also? Here’s how to connect a car amp at home.
- You can even connect a car amp to your home stereo as explained here.
- Put your car sub to good use! You can connect a car subwoofer to your home stereo.
Feel free to browse my other great how-to &info articles here.
Got questions or comments?
You can leave a comment below or reach me directly via my Contact page. Merci !