Installation personnalisée :Sony XAV-AX7000 dans une Ford Thunderbird de 1962
Dans cet article : Nous allons parcourir une installation personnalisée d'un Sony XAV-AX7000 dans un tableau de bord Ford Thunderbird de 1962. Plein de photos et d'idées !
- Présentation de Thunderbird pour 1961
- Enseigner de nouveaux tours à un vieil oiseau
- Première partie :une unité principale moderne
- Montage du Sony XAV-AX7000
- Deuxième partie :Conférenciers modernes
- Fabriquer un support
- Troisième partie :Ports USB dissimulés
- Quatrième partie :Installation de la caméra de recul
- Achèvement du projet
- Coût d'installation
Présentation de Thunderbird pour 1961
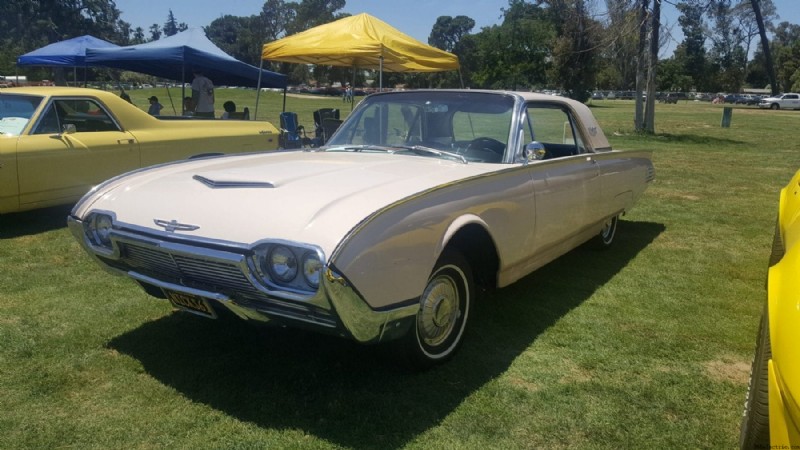
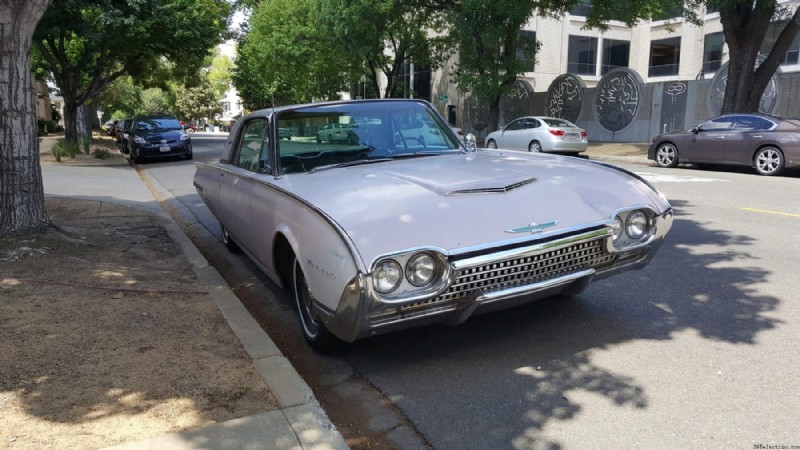
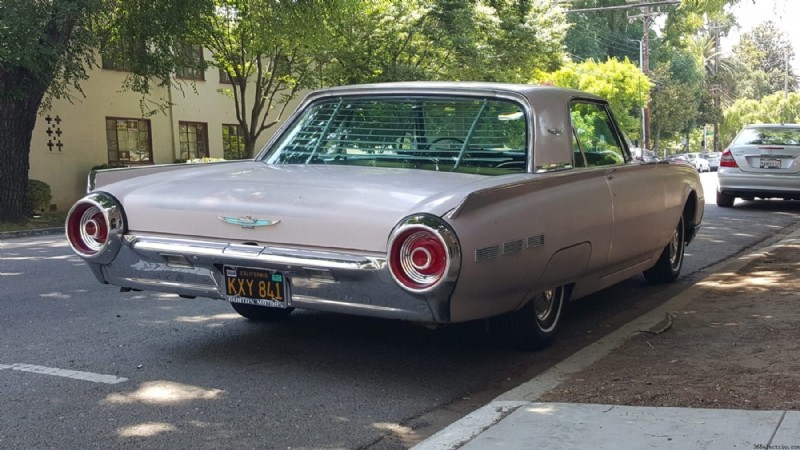
Ford a dévoilé la Thunderbird de troisième génération à l'été 1960. Le nouveau design ne ressemblait à rien sur la route à l'époque, ce qui était certainement à la hauteur du slogan publicitaire de l'entreprise - "Unmistakably New, Unmistakably Thunderbird". La voiture présentait un profil long et bas avec une partie avant nettement pointue qui se rétrécissait en minuscules ailettes à l'arrière. Les feux arrière surdimensionnés, ronds et chromés se distinguent, ressemblant à rien de moins que des moteurs à turbine à réaction et sont une véritable beauté la nuit. La voiture résolument en forme de munitions a mérité le surnom de "Bullet Bird".
Les ventes ont été correctes, mais n'ont pas atteint les chiffres records de la génération précédente, connue sous le nom de "Square Birds". Des caractéristiques telles que le volant pivotant et le tout nouveau moteur V8 de 390 pouces cubes n'ont tout simplement pas comblé l'écart entre l'apparence que les conducteurs voulaient d'une voiture et l'apparence de la nouvelle Thunderbird. En 1964, Ford est revenu à un style carré avec la Thunderbird de quatrième génération. Les ventes sont passées d'un pic de série de 3e génération de 73 000 (1961) à 93 000 (1964).
De nombreuses voitures classiques commencent sous-estimées ou même indésirables, pour devenir rares et désirables, ne serait-ce que pour leur histoire originale. Les Bullet Birds n'ont jamais fait ce saut. Alors que les prix des Thunderbirds de deuxième et quatrième génération ont grimpé en flèche ces dernières années, le Bullet Bird a langui dans la catégorie « ne vaut pas la peine d'être restauré ». Les voitures roulantes, à faible kilométrage et non restaurées peuvent être achetées pour moins de 10 000 $, et pour les restaurateurs qui cherchent à ressusciter la carcasse d'un Bullet Bird, les voitures peuvent être achetées pour moins de 1 000 $.
L'ironie du Bullet Bird est que lorsque les visiteurs du salon de l'automobile voient l'une de ces voitures désormais rares, ils pensent généralement que le véhicule est une sorte de coutume. Les pare-chocs chromés massifs et les garnitures en acier inoxydable qui s'étendent de l'avant à l'arrière n'ont pas l'apparence d'usine fade que beaucoup de gens associent aux voitures d'origine, et les lignes étranges ne ressemblent certainement pas aux conceptions du début des années 1960 que la plupart des gens connaissent.
Vous cherchez une excellente unité principale ? Découvrez nos meilleures listes !

Meilleurs autoradios DVD et vidéo en 2022
Meilleurs autoradios et autoradios en 2022

Meilleurs autoradios multimédias numériques en 2022

Meilleurs autoradios de navigation GPS en 2022

Meilleurs autoradios Apple CarPlay sans fil en 2022

Meilleurs autoradios compatibles iDatalink en 2022

Meilleurs autoradios à écran tactile en 2022

Meilleurs autoradios et autoradios à DIN unique en 2022
Enseigner de nouveaux tours à un vieil oiseau
J'ai eu une obsession avec le Bullet Bird depuis l'enfance. Je me souviens d'être allé à la rencontre hebdomadaire des voitures et d'avoir vu une Thunderbird rouge de 1961 avec un intérieur en vinyle rouge assorti quand j'avais probablement environ 12 ans. Tout ce chrome et ces feux arrière fous ont vraiment eu un impact sur moi, et je n'ai jamais vraiment lâché prise. engouement.
Lorsque l'opportunité d'acquérir une Thunderbird 1962 non restaurée qui n'affichait que 83 000 miles sur son compteur kilométrique à six chiffres s'est présentée, j'ai sauté dedans. La voiture était solide, mais triste. Pour autant que je sache, elle a été garée en 1968, a tenté de reprendre la route en 1989, puis plus rien. Il est resté assis jusqu'à ce que je l'achète en 2016.
La voiture avait besoin d'une tonne de travail pour être digne de la route, et il a fallu un peu plus de deux ans de travail les week-ends et lorsque les chèques de paie permettaient de reconstruire les freins, la direction, la suspension, le carburateur, le générateur et de remettre à neuf le système de refroidissement. Une quantité énorme de temps a été consacrée simplement au démontage des pièces chromées, au nettoyage et au polissage, et au remontage. Quelques jours avant mon 40e anniversaire, la voiture s'est réunie et j'ai pu sortir et la conduire. Et je l'ai conduit, en partant pour une odyssée d'environ 900 milles en quatre jours.
Une chose qui est rapidement apparue était le manque de technologie audio. Je suis sûr que dans les années 1960, il y avait beaucoup de stations de radio AM parmi lesquelles choisir, mais aujourd'hui, les options sont très limitées.
J'ai utilisé un haut-parleur Bluetooth portable pour mon lecteur, ce qui a entraîné un autre problème :charger tous ces appareils. Il s'avère que la prise accessoire 12 volts, connue sous le nom d'allume-cigare en 1962, a cessé de fonctionner. J'ai donc emporté une batterie portable. Deux téléphones, un pack de charge et tous les câbles associés ont créé un gâchis absolu d'absurdités emmêlées à l'avant. Pire encore, le haut-parleur était à peine audible à vitesse d'autoroute avec les vitres baissées, une nécessité en août dans ma voiture sans climatisation.
Il devait y avoir un meilleur moyen.
Première partie :une unité principale moderne
Le premier problème à résoudre était l'unité principale. Il est possible de passer à une chaîne stéréo AM/FM de 1963 et de moderniser une bande Bluetooth via un émetteur FM. La radio AM/FM de cette année-là est spécifique au Thunderbird, est aussi rare que les dents de poule et coûte cher même en état de non-fonctionnement. Ajoutez environ 300 $ supplémentaires en réparations nécessaires, plus le prix de l'émetteur, et ce projet peut rapidement dépasser les 1 500 $.
Des solutions de rechange sont disponibles et, pendant un certain temps, j'ai même envisagé de remplacer mon unité d'usine par l'une des options conçues pour être correctes de Classic Car Stereos. La chose la plus proche de ma radio d'origine est une reproduction de la radio AM/FM en option de 1963. Dotée de 45 watts x 4 canaux de puissance, de capacités Bluetooth, d'une entrée auxiliaire et de cinq pré-sorties, cette chaîne stéréo est une bonne option pour l'originalité. À un prix d'environ 687,50 $, la radio non originale est un achat élevé. Et bien qu'il offre de nombreuses fonctionnalités, certaines des choses que j'aime, comme Android Auto, ne sont tout simplement pas possibles avec une radio à deux colonnes.
La plupart des gens ne remarqueraient probablement rien de différent, mais je connais mes goûts, et une chaîne stéréo de 1963 dans mon Thunderbird de 1962 me dérangerait. En l'absence de critiques de la chaîne stéréo spécifique de Classic Car Stereos et d'un certain nombre de critiques ayant des problèmes importants avec les réclamations de garantie sur d'autres produits, j'étais assez méfiant à l'idée de perdre autant d'argent sur un produit d'une entreprise que je n'étais pas familier avec l'utilisation.
J'ai brièvement joué avec l'idée d'utiliser une tablette et une série de haut-parleurs sans fil, mais le caractère pratique de ce plan n'allait pas aboutir à une solution à long terme. Cependant, j'aime avoir la navigation disponible. Dans cet esprit, j'ai joué avec l'idée d'une tablette pour la navigation et d'une chaîne stéréo à distance cachée ailleurs dans la voiture.
Aucune de ces idées ne correspond vraiment à ce que je voulais d'une unité de tête stéréo. Chaque option était un certain niveau de compromis sans intérêt.
Un moment Ah-Ha
Au cours des semaines que j'ai passées à démonter, nettoyer et remonter l'intérieur, j'ai remarqué que l'absence de courant alternatif dans ma voiture ouvrait la possibilité d'une installation stéréo personnalisée. Alors que je travaillais pour nettoyer des décennies de saleté des plis sous mon tableau de bord, j'ai imaginé comment une unité centrale moderne s'adapterait.
J'ai de nombreuses années d'expérience de travail sur les voitures classiques. L'une des choses qui me met vraiment en colère, c'est quand je m'assieds dans un bel exemple d'un classique et que je vois que le tableau de bord a été massacré pour s'adapter à une radio monodin. Les dommages causés à un tableau de bord conçu pour une radio à deux colonnes sont en grande partie irréparables, altérant à jamais la voiture et sont éternellement tristes.
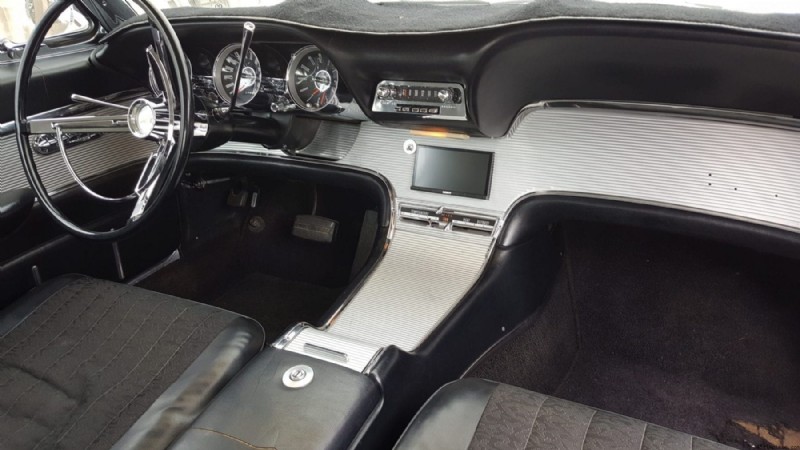
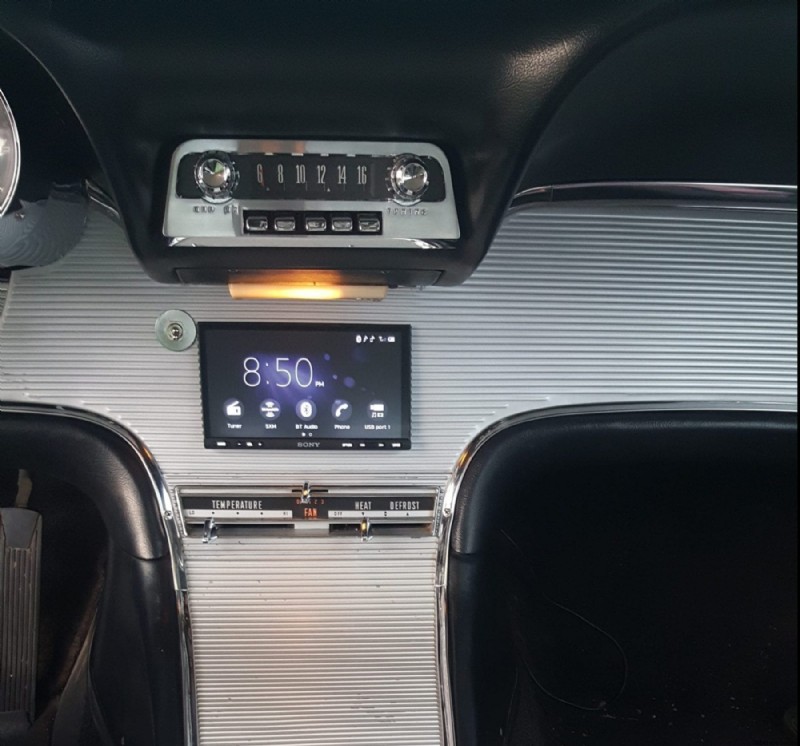
Ce que j'ai décidé de faire, c'est d'installer une unité centrale à écran tactile complètement moderne, très puissante, avec une tonne de fonctionnalités de connectivité modernes et de l'installer dans un Thunderbird de 1962 sans altérer de manière permanente la voiture.
Montage du Sony XAV-AX7000
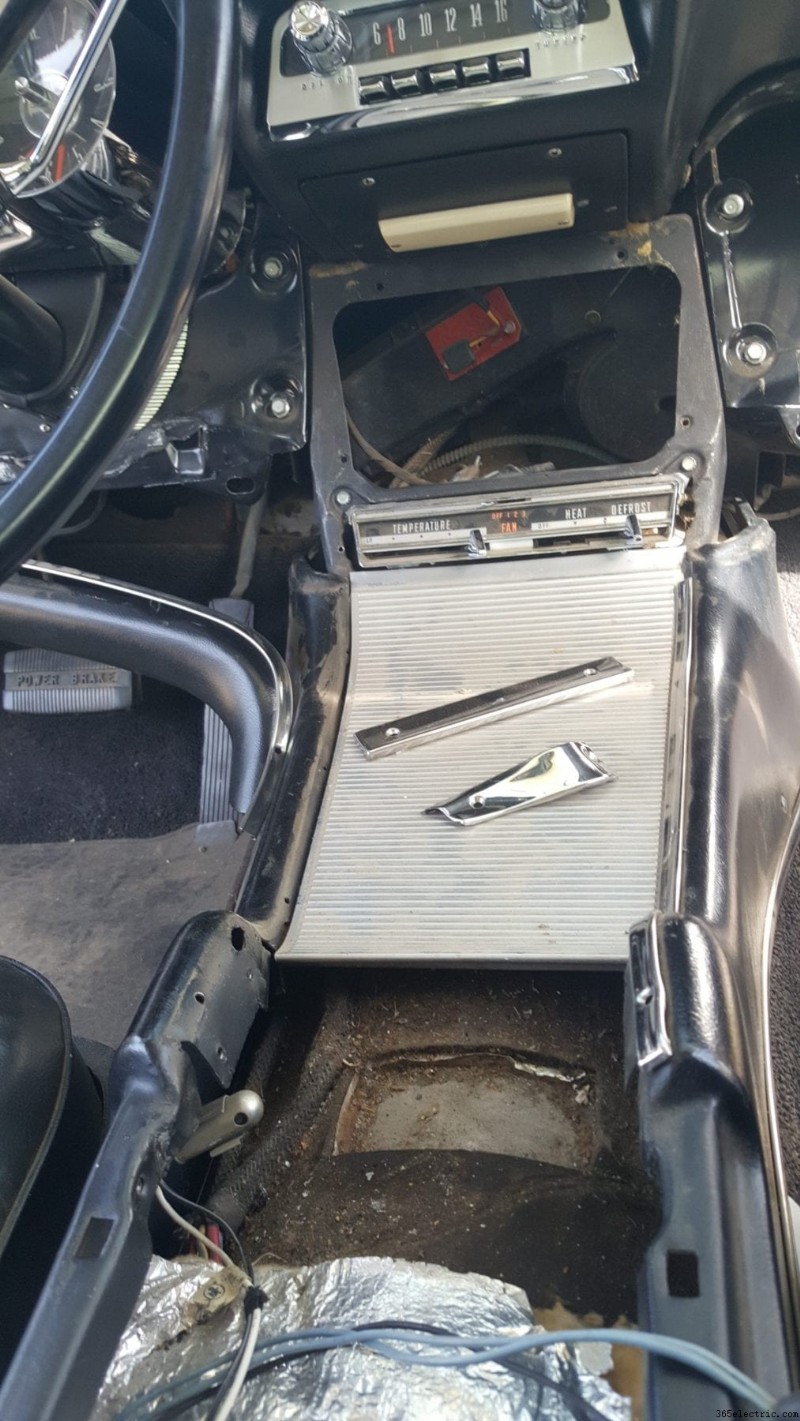
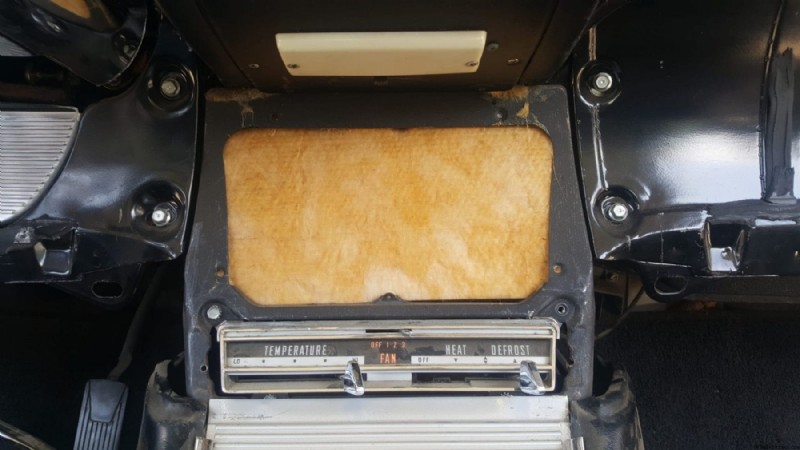
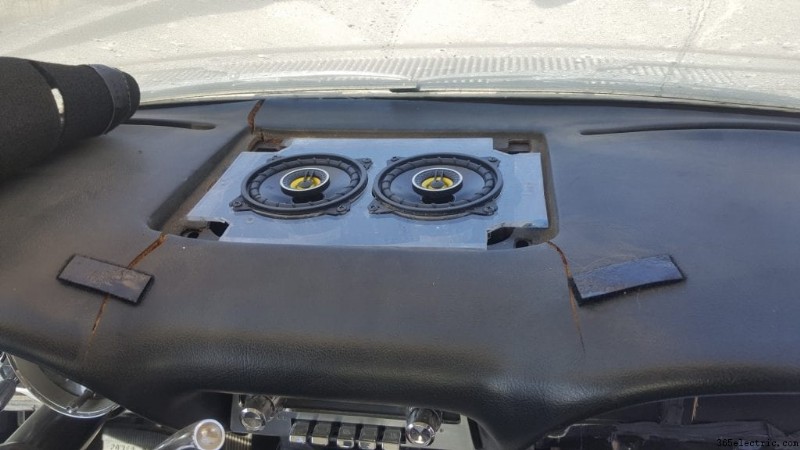
Avec le tableau de bord en aluminium et l'isolation qui bloque le trou où le registre AC aurait été si j'avais AC, un espace d'environ 9" de large au plus grand et d'environ 7" de large au plus étroit est révélé. Derrière le panneau en aluminium se trouve un vide d'environ 7 pouces de profondeur dans la partie la moins profonde. Mes leviers et câbles de climatisation courent le long du haut de la bosse de transmission sous cet espace. Derrière se trouve le boîtier de chauffage unique pour les voitures sans courant alternatif. Si vous voulez en savoir plus sur l'unité principale, j'ai fait une description complète et un examen du XAV-AX7000.
Il s'avère que cet espace fonctionne à merveille avec le Sony XAV-AX7000 que j'installe. Le tableau de bord n'est pas horizontal, mais est une courbe légèrement graduée. L'installation de la radio le long de la courbe du panneau inclinera légèrement l'appareil, ce qui lui permettra de dégager parfaitement les bras du câble de commande sur mon boîtier de chauffage.


Recycler, réutiliser, réutiliser
J'ai contacté Charlie Watkins de Watkins Restorations dans l'Oregon et il a pu m'envoyer un tableau de bord droit complet, original et en bon état d'un oiseau malchanceux qui n'en avait plus besoin. De cette façon, je n'ai pas sacrifié mes pièces d'origine. Si je le voulais, je pourrais revenir au tableau de bord d'origine sans aucun signe d'abus.
Après avoir retiré toutes les garnitures chromées, les garnitures en acier inoxydable et retiré les boulons qui fixent les genouillères et les panneaux qui terminent la zone porte-tableau de bord, le panneau en aluminium est doucement retiré. Il est uniquement maintenu en place avec un adhésif non durcissant et la tension de toutes les garnitures.
Conseil du jour :restez organisé. Si vous avez une vieille boîte à œufs à portée de main, elles fonctionnent très bien pour ranger les vis, les clips et autres petits objets. N'oubliez pas d'étiqueter vos pièces. J'aime acheter des sacs de rangement au Dollar Store sur lesquels on peut écrire avec un feutre.
Créer un motif
Imaginer une chaîne stéréo moderne dans une voiture classique est facile, mais sa réalisation demande un peu de travail, de la patience et beaucoup de mesures, de tests, de mesures, etc.
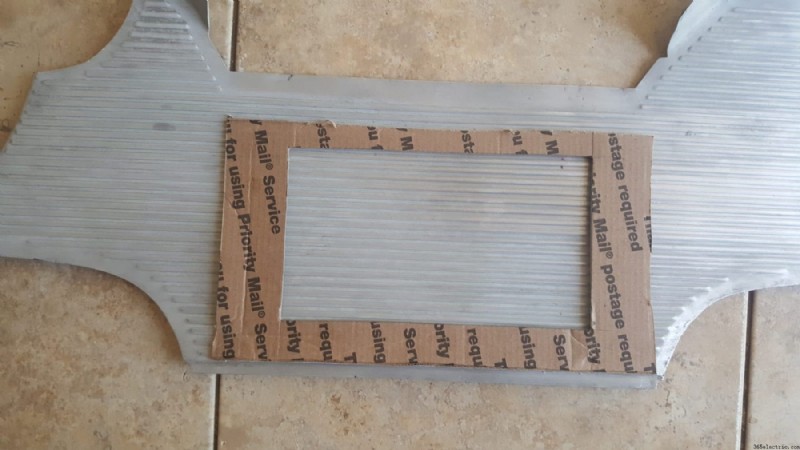
Une fois mes pièces d'origine retirées, je teste l'ajustement du tableau de bord de remplacement. J'ai placé du ruban adhésif le long du dos dans la zone où l'ouverture serait située. Avec le panneau fermement enfoncé en place et les trous des clips alignés, j'ai tracé une ligne autour de l'ouverture sur le ruban adhésif.
J'ai mesuré avec précision la taille exacte de la partie de l'écran Sony que je voulais faire sortir du tableau de bord et j'ai fait un motif en carton rigide. Après m'être assuré que le motif était bien ajusté, j'ai localisé le motif à l'arrière du tableau de bord en aluminium.
Avec mon motif dessiné à l'arrière du tableau de bord, j'ai sorti un outil rotatif avec une meule à tronçonner conçue pour le métal. J'ai coupé très soigneusement le long de la ligne et j'ai ouvert le trou.
Lorsque j'ai fait mon patron, j'ai pris la décision d'ajuster l'unité principale aussi serrée que possible, puis j'ai dessiné le patron sur mon métal à l'intérieur du patron. Cela a rendu l'ouverture un peu trop petite. J'ai utilisé une râpe avec un côté plat pour ouvrir doucement le trou pour s'adapter parfaitement à la chaîne stéréo.

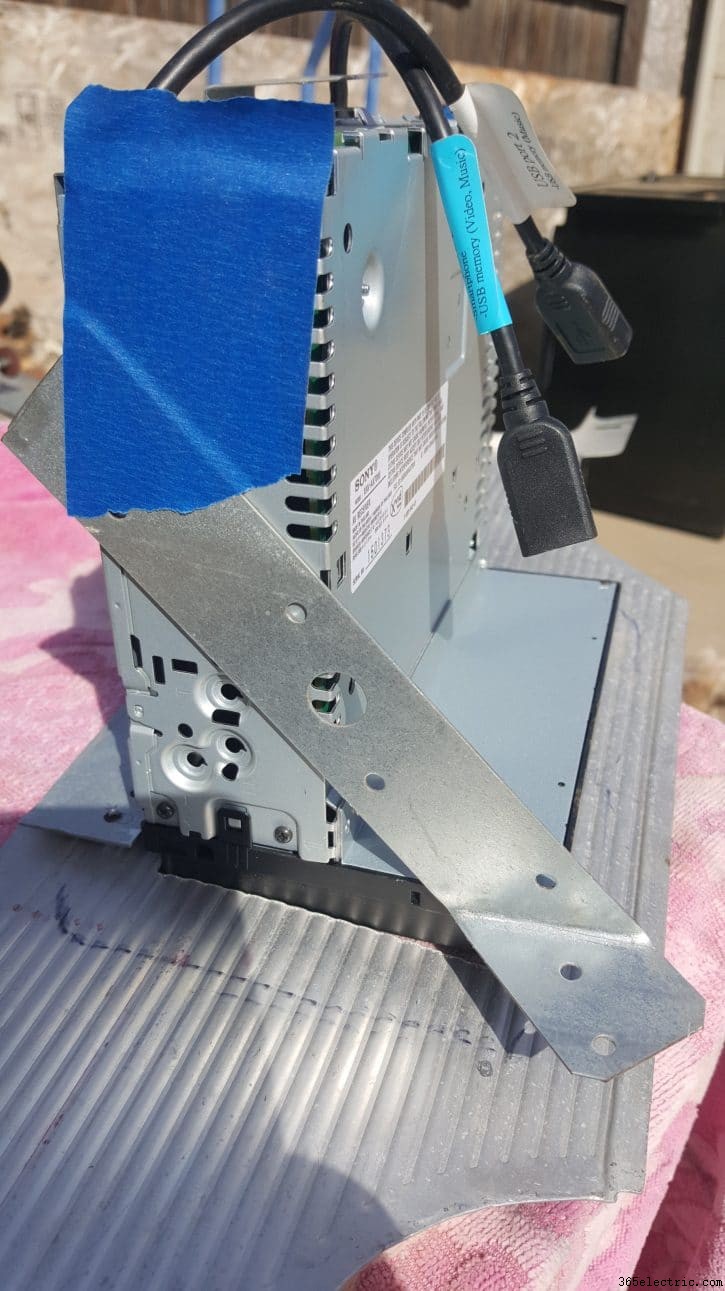
Mounting Up
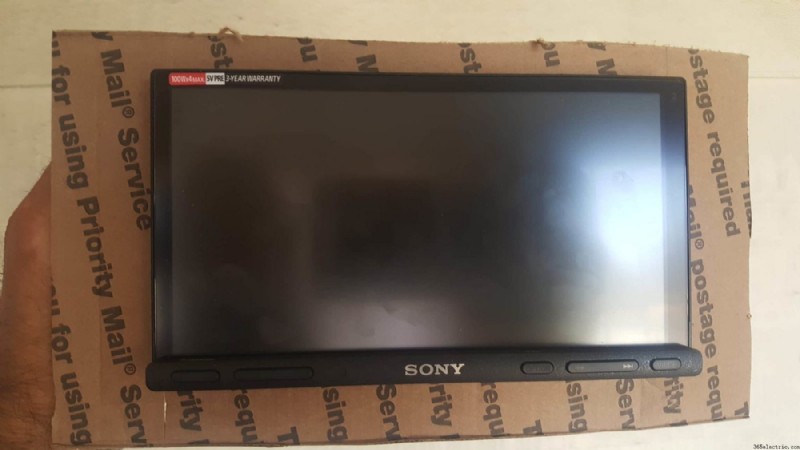
The Sony XAV-AX7000 is a single-din case with a double-din screen that measures just under 7”. Mounting options are not included with the head unit, so installers either have to purchase an aftermarket bracket or fabricate.
This was a tempting place to discard my intention to avoid damaging anything. Fabricating brackets was not hard, but sufficiently mounting them was another story. Drilling a few holes behind the dash wouldn’t ever show, anyway, but I would know it was there.
What I decided to do was to fabricate brackets that mounted using the holes intended for retaining the AC register. These holes were simply empty on my car, so I used a few small machine screws to mount brackets at either side.
I wanted the head unit to sit at an angle, and the brackets needed to be angled to enable the head unit to sit securely. Figuring this angle was simple using a little high school geometry, a level, and a tape measure.
I used the level and tape measure to find the rise and run of the triangle, then used the Pythagorean Theorem to solve for the hypotenuse. Don’t worry, I Googled it also.
What I found was that I needed an angle of 27 degrees to allow the bracket to align with the M6x4 screw holes in the chassis of the head unit. I used simple steel straps to fabricate my brackets. They are cheap, easy to bend, and durable.
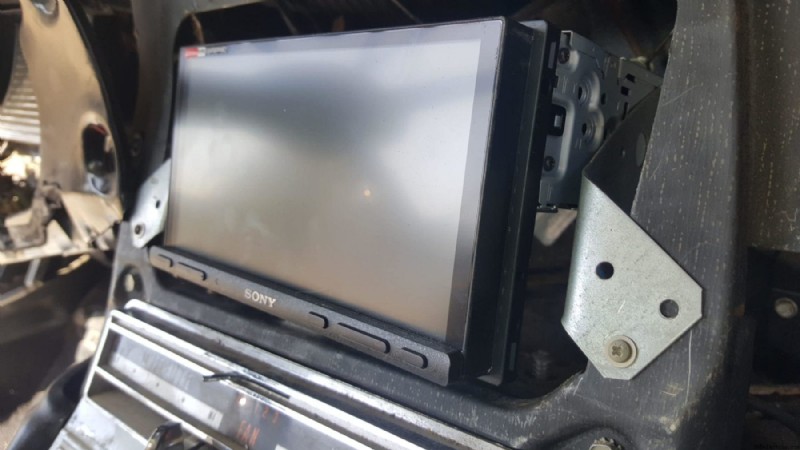
With my brackets bent and trimmed, I mocked the unit up to the dash and checked for clearance issues or binding. Everything looked pretty good. I tightened the brackets into place, sliding the head unit in between, and reinstalled the newly-trimmed dash panel. The head unit barely fits through the opening, to the point that extreme care needs to be taken to avoid scuffing the screen on the aluminum edges. With the unit held in place, I put the screws into the brackets and tightened down the head unit.
Even without the trim in place, I could tell I made a good decision on the head unit. It simply was understated and blended right in with all the other textures and materials around it, while maintaining its modernity.
Wiring it Up
Sticking with the theme that I wanted to be able to undo all the custom work without leaving any permanent damage, I ran all-new wiring to the Sony XAV-AX7000 head unit. This was probably necessary anyway, as the original stereo was not a powerhouse.
Don’t forget to disconnect the battery before beginning.
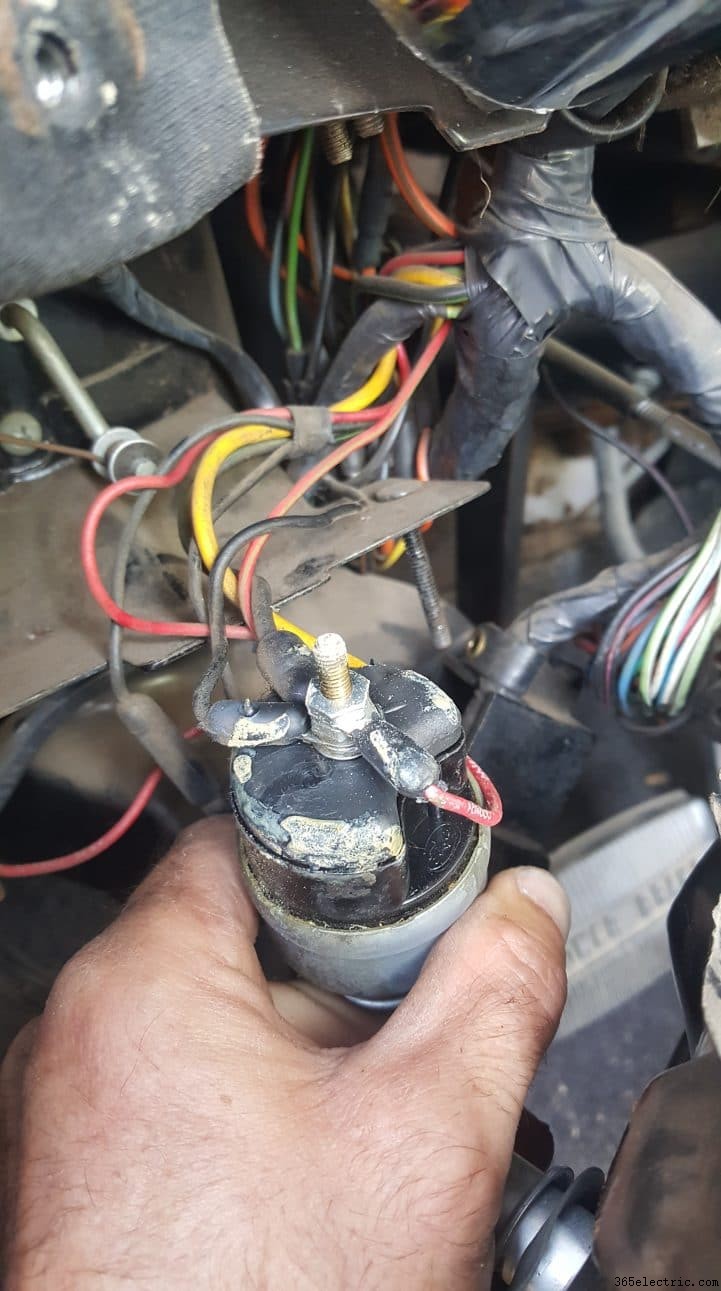
Constant Power
Per the instructions included with the Sony, I ran a 14 ga wire from the 12 Volt positive post on my starter solenoid to the head unit. I verified this with the key off and a voltmeter.
On the Sony wiring harness, the constant power wire is yellow, so that is what I ran also. I used waterproof crimp connectors that have heat shrink sleeves. I particularly like these connectors under the hood, where all sorts of nasty things happen. Corroded 12V positive connectors can be very dangerous.
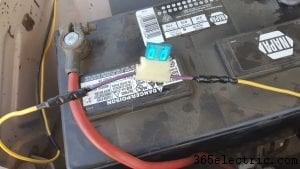 I installed a blade-type 15 amp inline fuse a few inches from the battery connection. This fuse will help prevent sudden surges of power that could damage the Sony head unit.
I secured the yellow wire with electrical tape alongside the wire that runs from the starter solenoid to the voltage regulator in my Thunderbird. I took advantage of a conveniently located factory grommet in the firewall and slipped the yellow wire through right behind the factory stereo.
Switched Power
Dropping the ignition switch to access the switched 12 volt connection required that the left side of the dash be unbolted. Most ignition switches can be removed using a paperclip and the ignition key. Turning the ignition switch to the ACC setting exposes a small pin in a hole in the face of the tumbler. Pressing this gently with a paperclip while continuing to turn the key counter-clockwise will release the tumbler. Then, simply press the switch toward the dash and turn slightly.
The factory wiring in my Thunderbird is very tightly bundled. There are very few areas where the wiring is easily accessible. This was a well-built car in its day, and the attention to detail shows in how well the wiring has held up.
I did not undo any factory wiring or change the routing of any of the factory items. I didn’t remove any wiring from the original stereo. This way, if I want to revert to an original car, I simply remove the wiring I ran and nothing else needs to be done. My car remains entirely original.
I used another shrinkable weatherproof connector to connect to the ACC post on the back of my ignition switch. I carefully routed the wire above the light switch and into the rear of the dash. The Sony harness uses a red wire here, and so I did also. I used the same 14ga diameter as in the constant power supply.
Finding the ACC switch position is easy. Simply put the tumbler back into the switch, reconnect the battery, and test the posts on the ignition switch. One post will have power even in the off position. Another will only have power in the ACC position. On Ford ignition switches, this is almost always the exposed post on the rear of the switch.

Avoiding Obstacles
The third generation Thunderbird had a unique feature called Swing-Away steering. When the transmission lever is lifted up, the steering wheel swings toward the center of the car. Door hinges that allow nearly 90 degrees of opening coupled with the swing away steering wheel make for one of the easiest cars to get in and out of.
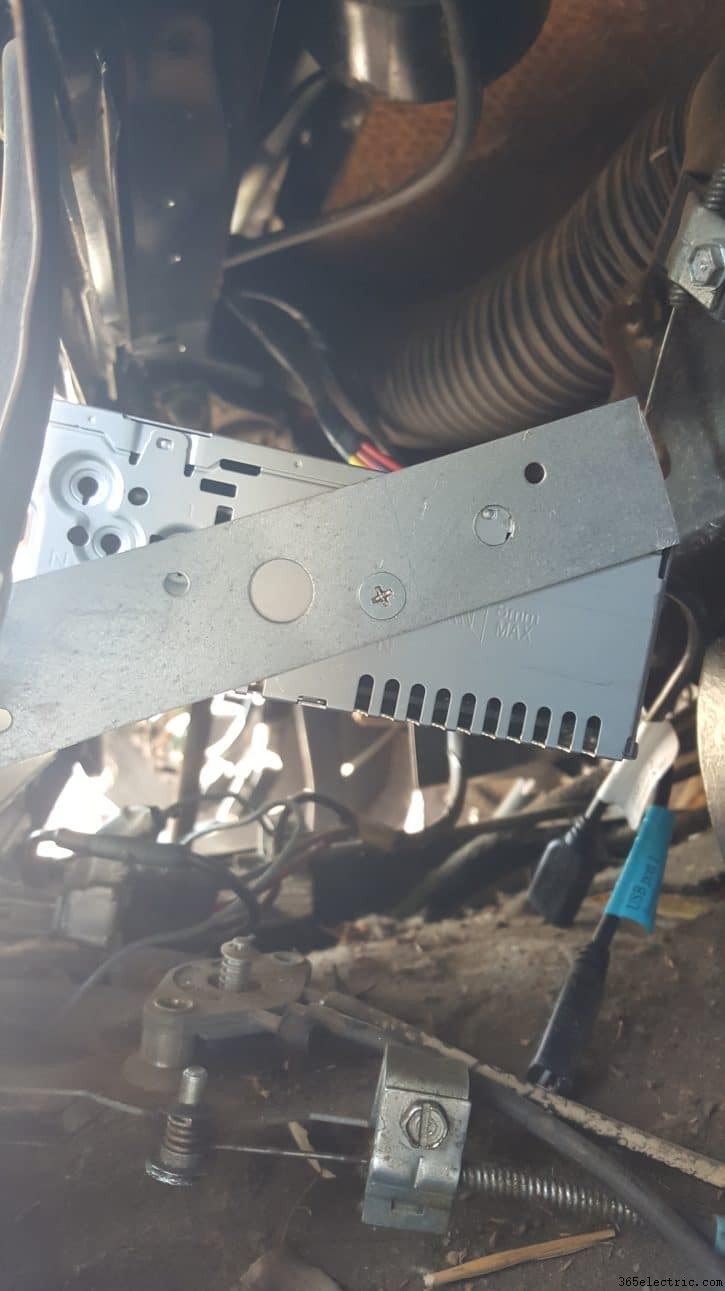
That cool sliding steering wheel also presents unique problems. In order to ensure that the wiring did not become tangled in the sliding mechanism, it meant that the wires had to be very carefully positioned and secured. I was able to use several factory wire clips that retained original wiring harnesses and passed the wire to the head unit with the help of a DIY fish tape made from a metal coat hanger.
The first time I ran the wire through, I did not pay enough attention to the location of the windshield wiper mechanism. My original location could have possibly gotten tangled up in the wiper arms, causing damage to any number of things. I rerouted the wire, making sure that it was tightly secured with no loose loops.
This is one of those tasks where taking the time to ensure everything is correct can save immeasurable time later down the road.
I should have installed the microphone at this point. I did not, and ended up having to try and install it after the car was put completely back together. It did not work out.
I installed the microphone wire behind the chrome trim on the windshield pillar. The supplied clip worked great for attaching the microphone discreetly to my sun visor.
Grounding it Out
The Sony unit requires that a lead be connected to the parking brake illumination point. This tells the head unit the car is not being driven.
This was something I did not want to undertake, as it would mean cutting into the wiring. Instead, I routed the parking brake wire to the same point as my ground strap. Using a shrinkable crimp connector, I connected the ground and parking brake wires. I used an existing ground point and tightened it down.
With some head units, grounding out the parking brake wire will allow Android Auto and other features to function. In many instances, a trigger adapter is required. These are available from aftermarket companies.
Turning it On
These three connections allowed me to start the stereo up and see how it looked sitting in the driver's seat. It looked fantastic. I could easily reach the screen, and even in broad daylight, the screen was clear and easy to read. Once the microphone was connected, I could take advantage of voice commands to control the unit, but it was important to me that the screen also be easily accessible when driving.
I decided that my brackets could use a little adjustment, so I went ahead and took everything apart, made some changes to the brackets including adding a channel for adjusting the clamping point on the head unit, and refit everything.
The Sony XAV-AX7000 is truly a wonderful bit of technology. The screen is clear and easy to see, and when you tap on an icon, it is instantly responsive. The menus are intuitive, and it is very easy to quickly get to what you want. The home screen is among the best I have used. I like simple, and the home screen is as simple as it gets. No guessing what the icon means here, just select what you want and away you go.
The next project would be addressing the factory speaker.
Part Two:Modern Speakers
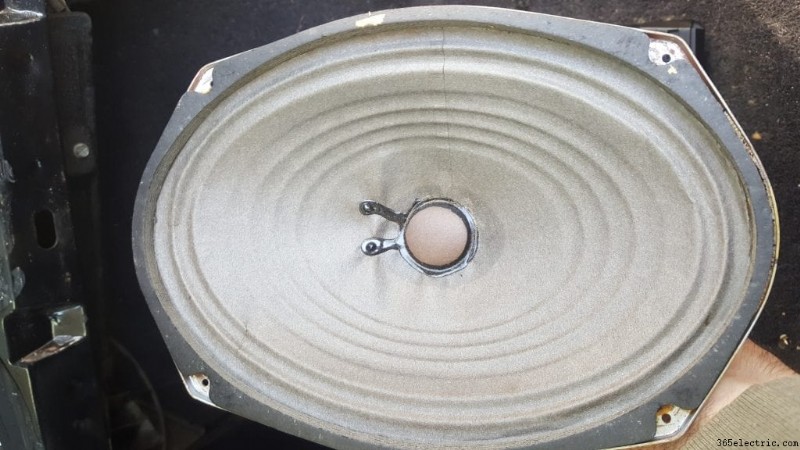
The factory dash speaker in the 1962 Thunderbird is a paper cone 6×9. Even in its day, this speaker was not very good, and 57 years of sitting in the dash did this one no favors. While the speaker does not appear to have any actual damage, the 45 watts of power the Sony XAV-AX7000 pumps out is going to be way too much for this old speaker.
Aftermarket solutions are plentiful. Ford engineers decision to use a common speaker size plays in the favor of drivers looking for custom sound. A whole lot of vintage cars use odd sized speakers that are difficult to upgrade, but not this old Thunderbird.
It seemed to me that it would be a shame to install this beautiful touchscreen head unit and hook it up to a stock-style mono speaker. It is a good thing I set my sights on something other than stock, though, as the stock replacement speaker has been discontinued Today, all the aftermarket solutions use a single 6×9 with dual voice coils. Crutchfield lists one for $89.99 that is produced by RetroSound.
I am not crazy about a single speaker playing both left and right channels, and I wasn’t too interested in spending $90 on one speaker, either.
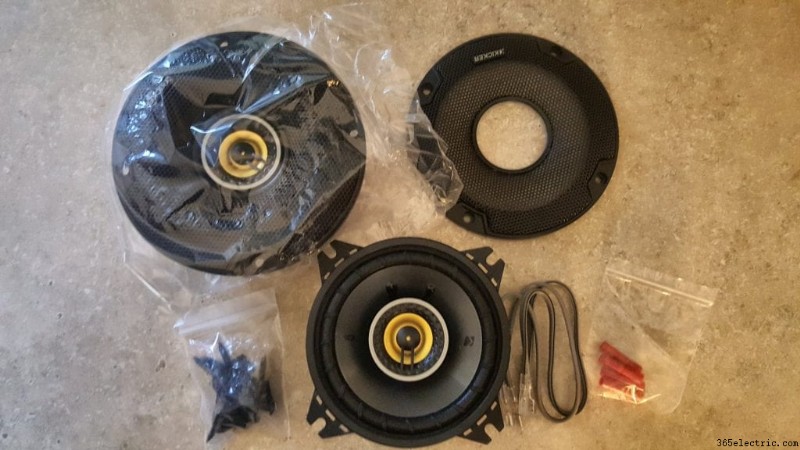
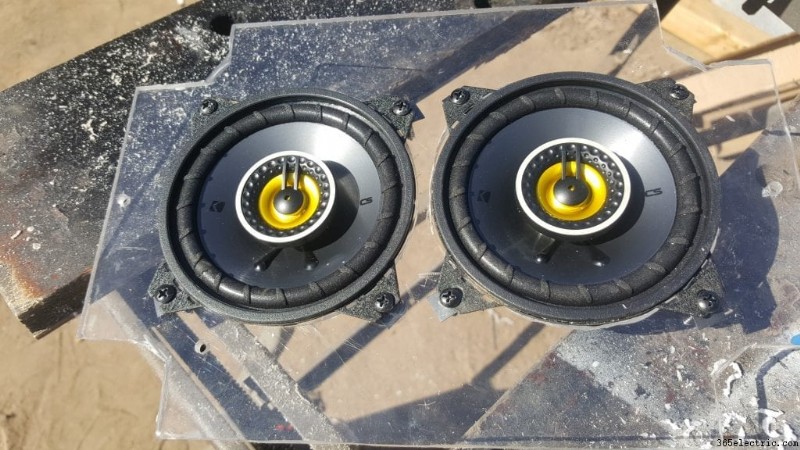
I found a really slick set-up built by Custom AutoSound that uses dual 4” speakers mounted on a plate designed to attach in place of a factory 6×9 dash speaker. At $74.95 through Classic Car Stereos -and preloaded with Kicker CS speakers- this option was still quite expensive.
I recently reviewed the Kicker CS-series speakers and knew they were a good speaker. I also knew that a pair of 4” Kicker CSC4 Coaxial speakers run less than $50. Amazon Prime hooked it up with same-day delivery.
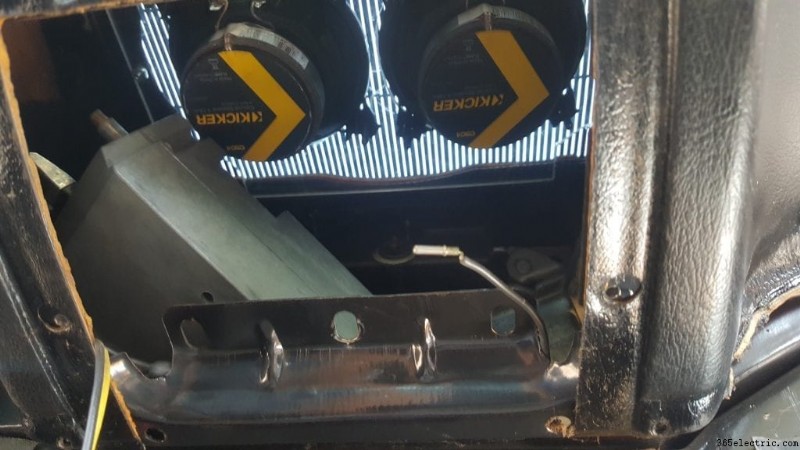
The factory speaker is removed easily. The dash grill clips in place, so a gentle pry on the front edge and the cover pops up and slides out of the way. The factory speaker has two screws retaining it to the dash. With these removed, the speaker lifts up and is disconnected from the wiring.
Fabricating a Bracket
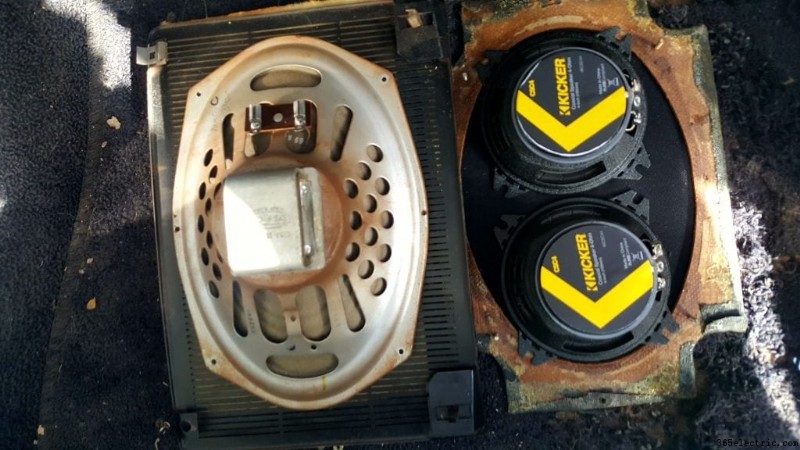
With the factory speaker removed from its mount, the 4” Kickers line up very nicely inside the space, but will require a custom-made mount. Almost any rigid material will work here. I have seen custom speaker mounts in wood, plastic, metal, and just about everything else.
I decided to use acrylic because I had the right size of a scrap from a previous project on hand. I dislike working with acrylic, but it does provide a nice, stable surface to mount speakers into.
I used the original factory grill to make a pattern drawn out directly on the acrylic with a felt-tip marker. I used a cutting bit on a rotary tool to cut out the needed shapes, then used a round rasp and a grinding bit to smooth and enlarge the speaker openings for a tight installation.
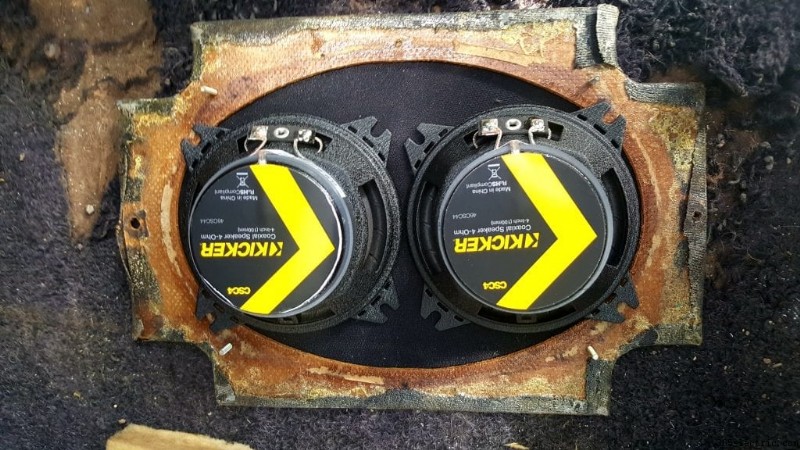
Once the speakers could fit inside the mounting hole, I drilled the holes for the speaker retaining screws. I mounted the speakers up and took some pictures of my DIY dash speaker.
Installing the speakers into the dash was a little different than removal. The Kicker CS-series have a very low profile tweeter dome, but it is still larger than the nonexistent dome of the factory speaker. Even when mounted underneath the acrylic, the tweeter touched the metal grill cover.
In order to mount the speaker, I decided to attach it from underneath the dash. The speaker opening provides abundant room, so I was able to shimmy the speakers into the hole. I had to remove the factory radio to access the speaker mounting screws.
In the Thunderbird, an access panel below the stereo needs to be removed to loosen the stereo retaining bolt. The knobs on the face of the stereo simply pull off, revealing the retaining nuts. Once these are removed, the diecast face of the radio comes off and the head unit can be pushed back into the dash.
I didn’t want to take the head unit all the way out to mount the speakers, as there would be no way to get it back in the dash. Fortunately, there was plenty of clearance to move the stereo to one side.
Aligning the mounting screws and tightening it all down was a bit of a pain, but I eventually got it. Now, the brand new Kicker CS4s have plenty of clearance and the dash still looks factory correct. I did not alter anything in this installation, and I saved the screws and clips I did not reuse along with the factory speaker.
After I had the original head unit reinstalled, I fired up the Sony XAV-AX7000 to see how the dual dash speakers sound.
Centrally located dash speakers are not an ideal location for good sounding music. I was quite surprised by the richness the Kicker speakers produce in the dash. The speakers are very clear, if a little high-pitched, but lacking any supporting speakers, they sound very good.
The more I played with the Sony XAV-AX7000, the more I came to like it’s features. Adjusting the tone and speaker settings was straight-forward and immediately improved the sound quality of my set-up.
Bluetooth set-up was simple and fast, and in a brief time, I had Pandora running on screen. Pretty slick.
Many users of the Sony XAV-AX7000 will be able to use Android Auto and Apple CarPlay wirelessly, but not me. I have an older phone that I am not ready to replace yet, but it requires that I use one of the USB leads in the back of the head unit to run Android Auto.
On to Part Three!
Part Three:Concealed USB Ports
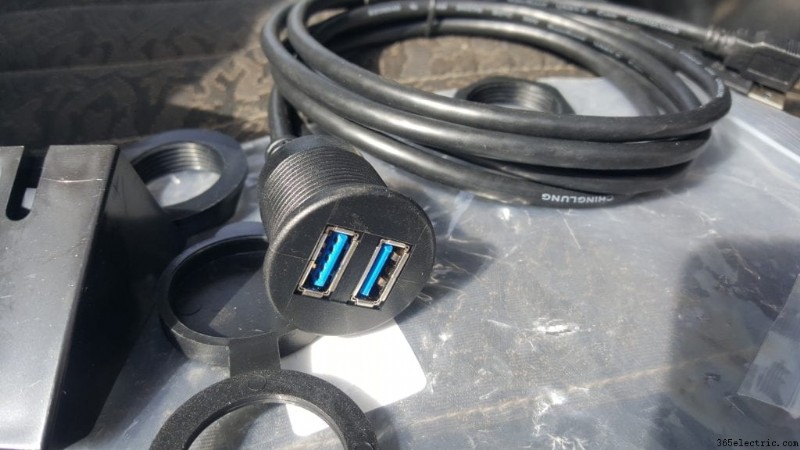
Now that I had the Sony XAV-AX7000 wired up and playing through dual Kicker CS4 speakers in my dash, I needed to have a way to plug my phone in without wires dangling everywhere, and, of course, not damaging anything.
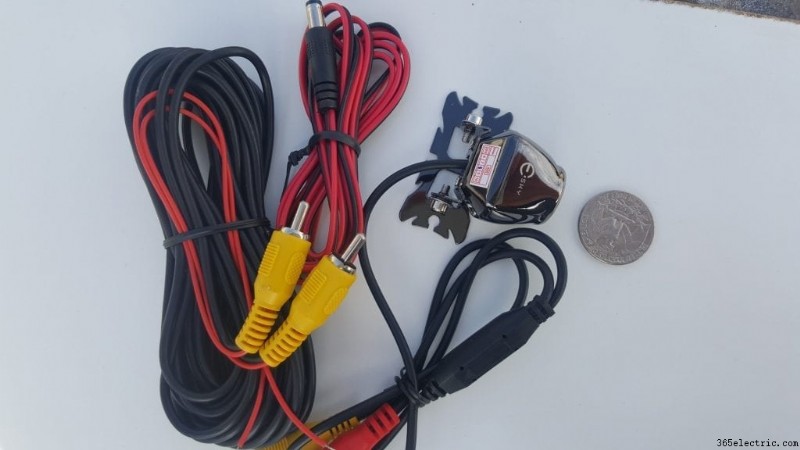
The solution is a dual port USB plug. Amazon Prime had exactly what I was looking for with same-day delivery.
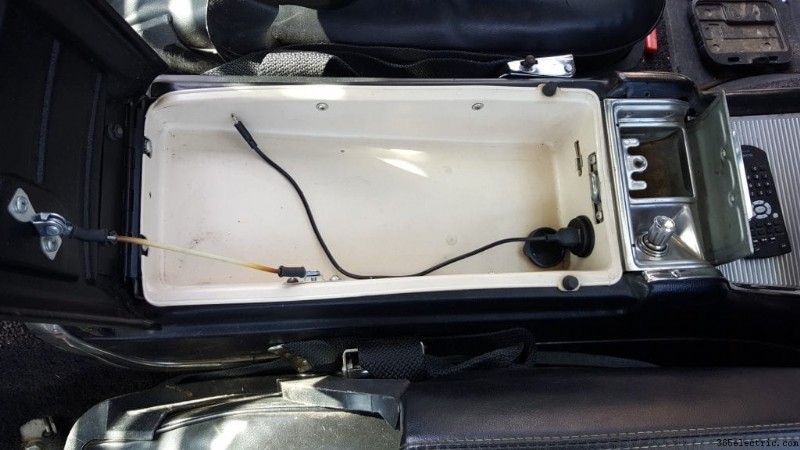
I decided that I wanted to install the USB port inside the locking center console that serves double duty as the glove box. I would need to remove the rest of the trim to get the glove box out and run the wires.
Ford went crazy with the stainless steel screws in this car. Almost every bit of trim is held down with several screws and clips. It is really important to stay organized when undertaking a project like this. There is simply no way the average person is going to remember where each screw goes.
With the glove box tray and the ashtray removed from the center console, I could see that the best place to run the wires was off to the passenger side underneath the center console.
I wanted a nice, tight, professional fit, so I measured the plug carefully, drilled a smaller than needed hole, and used a round file to open the hole up to the correct size. The plug fits great.
As I reassembled the console and ashtray assembly, I found that the USB extensions interfered with the hinged lid of the ashtray. It took some wiggling, but I finally got the wires to sit in such a way as to permit the lid to open all of the way.
With the cables pulled through the console, it was just a matter of connecting them to the Sony XAV-AX7000. The head unit has two USB ports, but they are not equal. Port #1 is intended for smartphone connection, while Port #2 is designed for USB storage devices and charging purposes.
I plugged my phone into the top USB port and connected the #1 USB lead, and viola , I had a direct connection. The Sony head unit immediately switched to smartphone mode and brought Android Auto up on screen, complete with Google Maps on a satellite image showing me in my yard.
This was an easy little project that took less than an hour to do and added the instant convenience of USB connectivity, phone charging capabilities, and no wiring hanging around the cockpit. As a bonus, my center console lid locks, so I can forget my phone in relative security.

Part 4:Backup Camera Installation
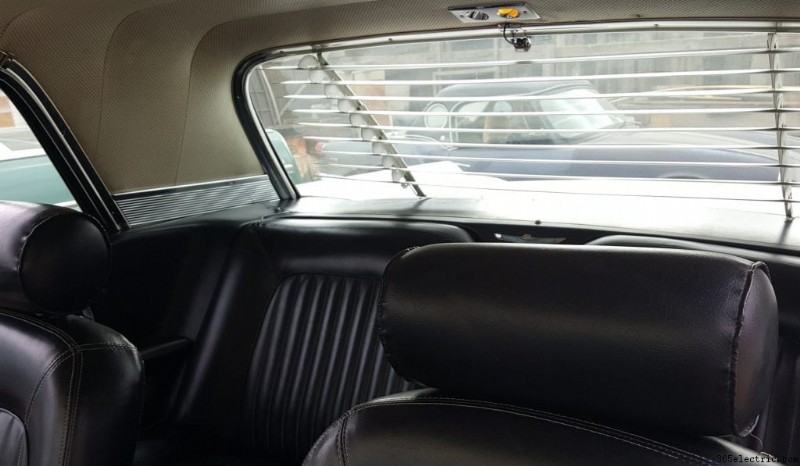
The 1961-63 Thunderbird introduced a feature that has become nearly universal, the floating rear view mirror. Every car prior to the Thunderbird used some type of physical mount to the dash, windshield, or wherever to hold the rear view mirror.
The original rear view mirror is a thing of beauty. It hangs from an adjustable aluminum mount and is a spectacle of chrome-plated metal and glass, complete with a Day/Night rocker switch.
The problem is that this mirror is very heavy. I have not been able to keep mine glued in place for more than a few days. It is rather startling to be cruising down the road and suddenly have this large, chrome mirror crashing down on you. I have mine in the car, but I have given up gluing it in place.
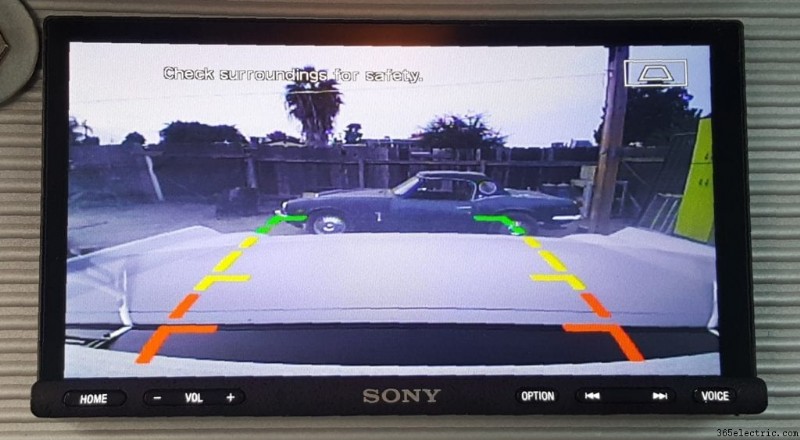
The 7” monitor on the Sony XAV-AX7000 is a truly beautiful, glare-resistant piece of technology. With built-in backup camera capabilities, I figured, why not use a backup camera as a rear view mirror?
I decided on a micro-camera from Esky to serve as my rear view camera. This camera is small and lightweight, two key things to me. You can also find a great list of the Best Rear View Backup Cameras.
I wanted to install the camera on the inside of the rear glass and attach it along the center trim. To avoid damaging the trim, I decided to use a small piece of velcro. With the camera temporarily in place, I wired it up and checked the picture. My window was extremely dirty, but the image looked pretty good, so I got to disassembling.
First, the rear seat had to come out. Classic car seats are all about the same -the bottom is clipped in place, while the top section is retained with a few bolts. I removed all of the chrome trim around the window, across the sail panel, and also removed the drivers side rear side panel along with all the window switch wiring.
The Esky camera is tiny, but the connections to it are bulky. The camera requires an RCA connector that feeds the video signal and a second RCA-type cable for powering the camera. These connectors were not far enough away from my mounting location to be easily hidden, so I had to come up with a solution.
What I ended up doing was removing the dome light and a couple of the staples that hold the headliner in place along the rear window. I very carefully fed the RCA connectors and extra wiring between the headliner and the roof of the car into a hollow space created by the dome light housing.
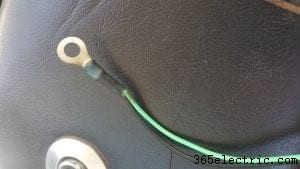
The name of this project is to upgrade without altering anything, and in order to stay true to that goal, I had to extend the ground wire about eight inches to use an existing ground point rather than simply throwing a self-tapping sheet metal screw into metal behind the seat.
I ran the RCA and Power cables behind the rear side panel, through a gap in the structure, and under the sill plates. I removed the front drivers side kick panel and ran the wiring behind the panel into the dash.
Now, here is where everything got a little complicated.
The connections seemed like they should be obvious. The RCA camera plugs into the Camera port on the Sony XAV-AX7000 and the power connection goes to the ACC terminal. The Reverse IN wire on the Sony harness connects to the reverse switch, which is not what I wanted to do.
I wanted to be able to turn on the camera any time I wanted, so I needed to wire the camera a little different. A couple of extremely helpful emails with the customer service reps at Esky and I realized that the trigger wire for the RCA cable needs to be wired to 12 volt power and the Reverse IN wire needs to connect to the trigger wire on the RCA cable.
In order to allow the camera to be turned on all the time, I needed to wire in a toggle switch. I decided to use 16 gauge green wire for the camera so I could easily tell it apart from other wiring. I used crimp connectors with shrink wrap sleeves for the ACC connection and connecting the switch.
Today’s Pro Tip:Be patient. Fabrication is never easy, and when you try and rush things, mistakes happen.
Case in point:
I drilled the hole to mount the toggle switch near the opening for the head unit in the aluminum dash. I needed a slightly bigger than ⅜” hole. I started out drilling a small pilot hole, then moved to a larger bit. I got impatient. The sun was going down and I wanted to get the switch wired up before dark. Instead of slowly progressing to a ⅜” bit, then filing the hole, I grabbed a brand-new 1⁄2” drill bit and went at it.
The drill bit stuck in the aluminum, and being a soft metal, simply shredded an egg-shaped hole nearly ¾” in diameter. My toggle switch would not mount, and worse, the aluminum dash I was working with was now badly damaged.
My options were limited, so I used a couple of flat washers, polished them up a little, and sandwiched the busted dash together. While not the super clean look I was going for, the washers did allow me to recess the face of the switch into the dash for a clean, flush finish.
Getting the camera up and running took a couple days and lots of disassembly and reassembly. I spent nearly half a day removing and replacing the interior of the car just to run the wires. A major issue with this camera is the included instructions that simply omit the trigger lead on the RCA cable from all wiring diagrams. When I reached out to Esky, they emailed me a proper wiring diagram that matched up with the components I had. In fact, they even sent a series of follow-up emails just to be sure I was satisfied with my camera. Great company, in my opinion.
The camera works okay, though the image is a little distorted due to the curvature of the back window glass and the wide angle lens picks up reflections. At night in total darkness, it is not easy to see what is behind the car. The Esky camera does not use IR technology, so I didn’t expect much, but the view at night is basically useless when glare is present. The toggle switch makes using the camera extremely convenient.
Unfortunately, it does not seem possible to get rid of the parking lines the camera applies. Because my camera is mounted inside the rear glass, the parking lines make no sense whatsoever. The velcro proved to be a temporary solution on a warm afternoon, so I reassessed the mount and decided I could carefully bend and wedge the lip of the camera under the trim.
It is important to take these projects slowly and progress one step at a time. Minor mistakes can create major problems. When I tried to install the microphone after I had installed the head unit, I accidentally broke the center pin of the RCA cable supplied with the Esky camera inside the Sony head unit. I had to order a new RCA cable, which I will then have to install. That means doing this entire step over again.
Project Completion
Now that I have the Sony XAV-AX7000 installed in the 1962 Thunderbird with custom 4” Kicker CS speakers in the dash and a backup camera from Esky, this old car is nearly as technologically rich as a modern cruiser. Of course, I still have lap belts (aftermarket, since seat belts were an option in 1962), no air bags or safety sensors, or pretty much any other safety feature, but I can text and drive hands-free, get directions to the nearest gas station, and rock out all day.
The Sony XAV-AX7000 head unit is a winner. It provides plenty of power, is easy to control, and has a complete range of options to connect to a wide assortment of devices. The head unit is a pleasure to use when driving. Android Auto running from an older phone works flawlessly.
The backup camera is probably the biggest disappointment. I was hoping to get a properly usable image, but it seems that in most light, the camera focuses on the reflections and glare on the back glass instead of what lies behind me. In most light, I can tell if someone or something is behind me, but the details are fuzzy.
At higher volumes, the dash speaker set-up has some reverb or rattling that is annoying, and the little 4” Kickers do not handle bass well. Given the frequency response of the speakers, I didn’t expect to get thunder, but the distorted bass is distracting and will require reassessment. It is possible that I could have used 5 ¼” speakers with some wiggling to get them within the dash, but mounting options almost certainly would have meant altering the dash in some way.
The total installation took place over the course of several days. I wish the toggle switch installation would have gone better, but overall, I am happy with the results. I think the Sony head unit looks excellent in place, and the sound is so much better than the original AM radio or the bluetooth speaker I used. I am very happy with how the head unit sits in the dash, and how easy it is to operate.
The 1962 Thunderbird has always represented a triumphant, glorious future to me. I have always seen the car as Ford’s vision of the future. Upgrading the head unit, for me, is a step in keeping the car driveable and safe, while adding the futuristic connectivity options modern car owners enjoy. I think this custom set-up provides all the futuristic options this old ‘Bird deserves without functionally altering the car in any way.
Cost of Install:
- Sony XAV-AX7000:$599.99
(Note* This head unit was provided for free by Sony for the purpose of an unbiased review. This is the second car it has been installed in)
- Kicker CS4:$49.95
- USB Plug:$10.80
- Backup Camera:$16.99
- Various electrical wire:$21
- Various Electrical Connectors:$12
- Electrical Tape:$2
I used metal construction straps for the brackets and a piece of spare acrylic for the speaker mount, all of which I had just laying around, so these items were free. Figure between $3 and $10 for materials to fabricate brackets.
Total Cost of Upgrade:$712.73